Press "Enter" to skip to content

Tag: Linux

Set up self-hosted runners for Github Actions

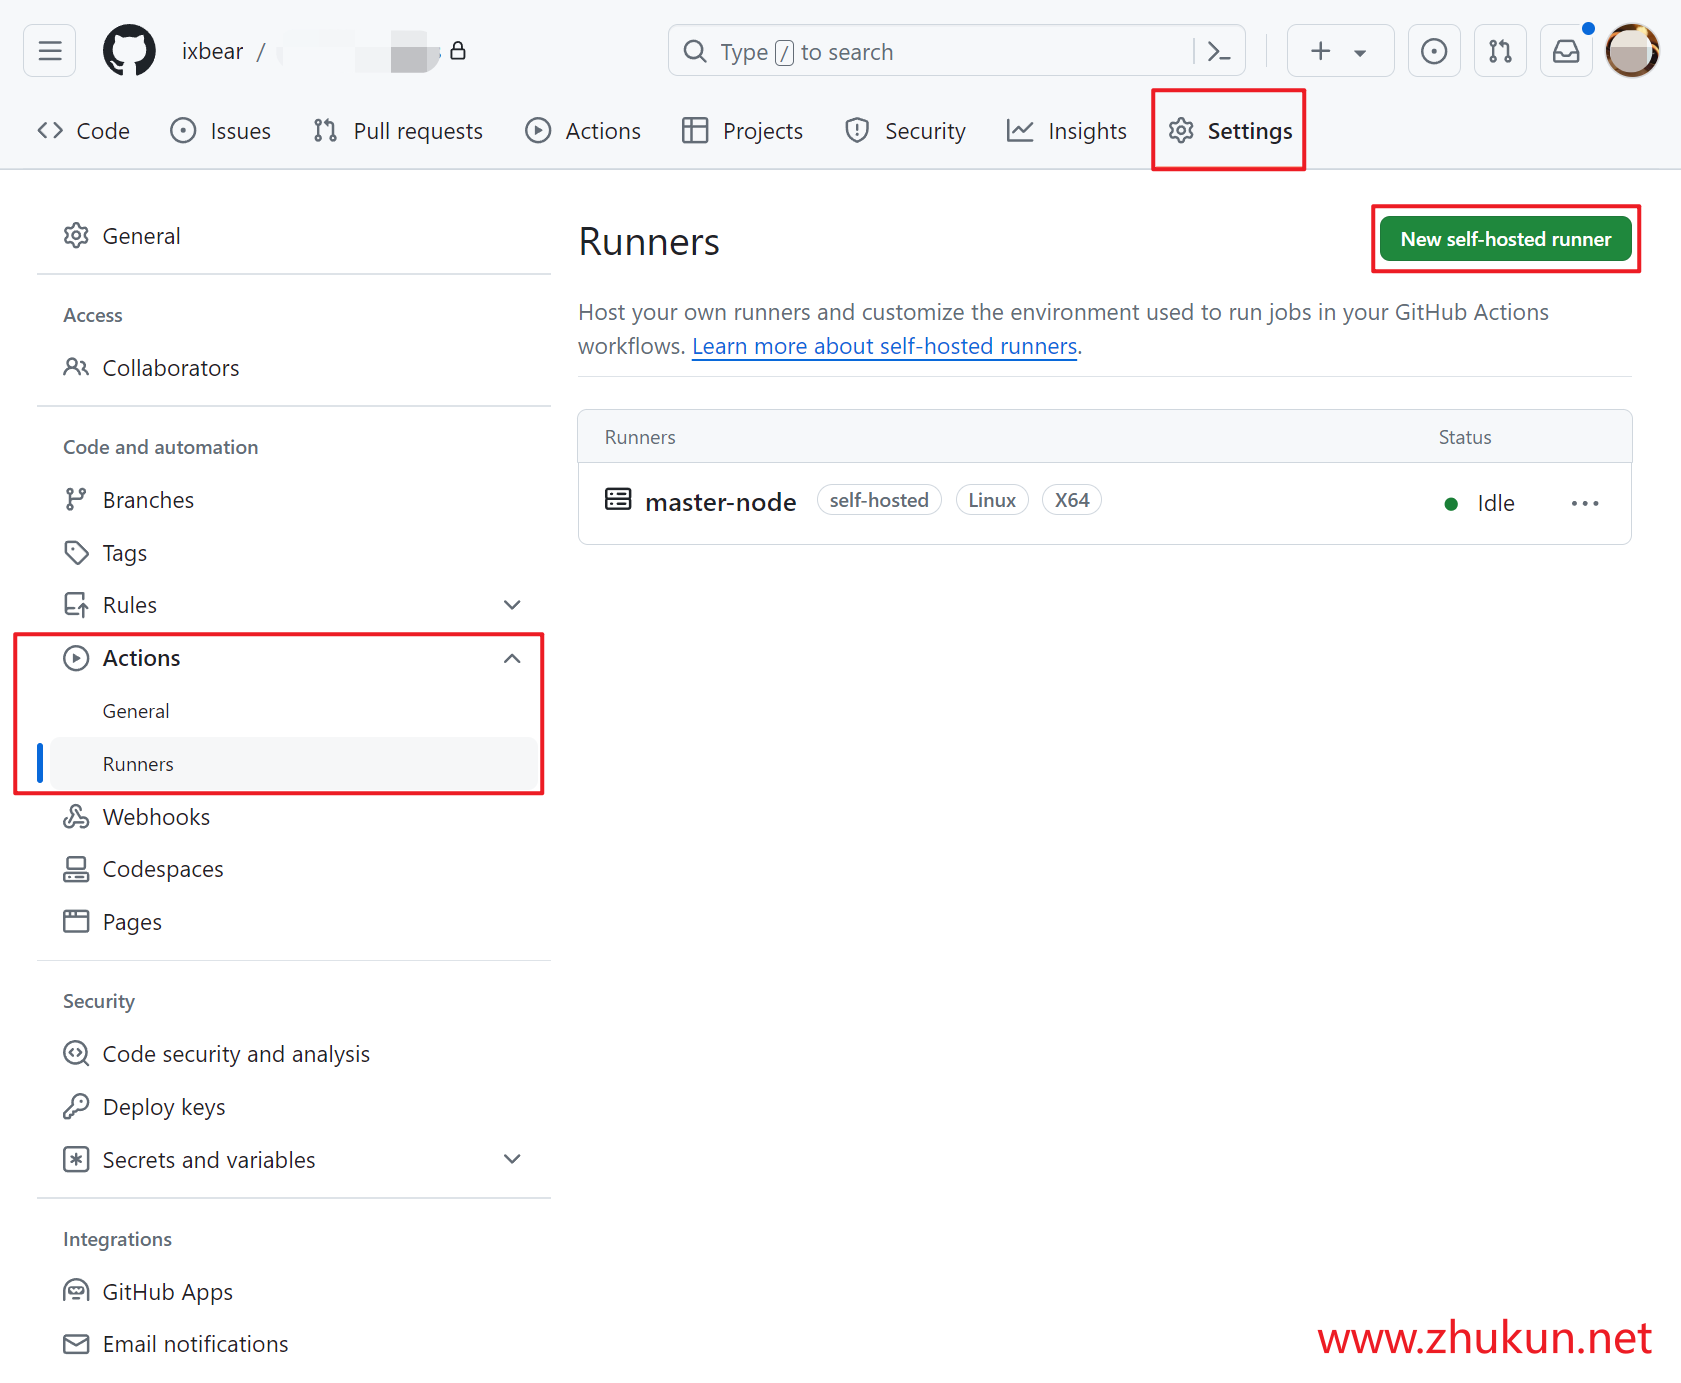
Add and Install a new runner on our host

Highly recommand run self-hosted runner as a systemd service
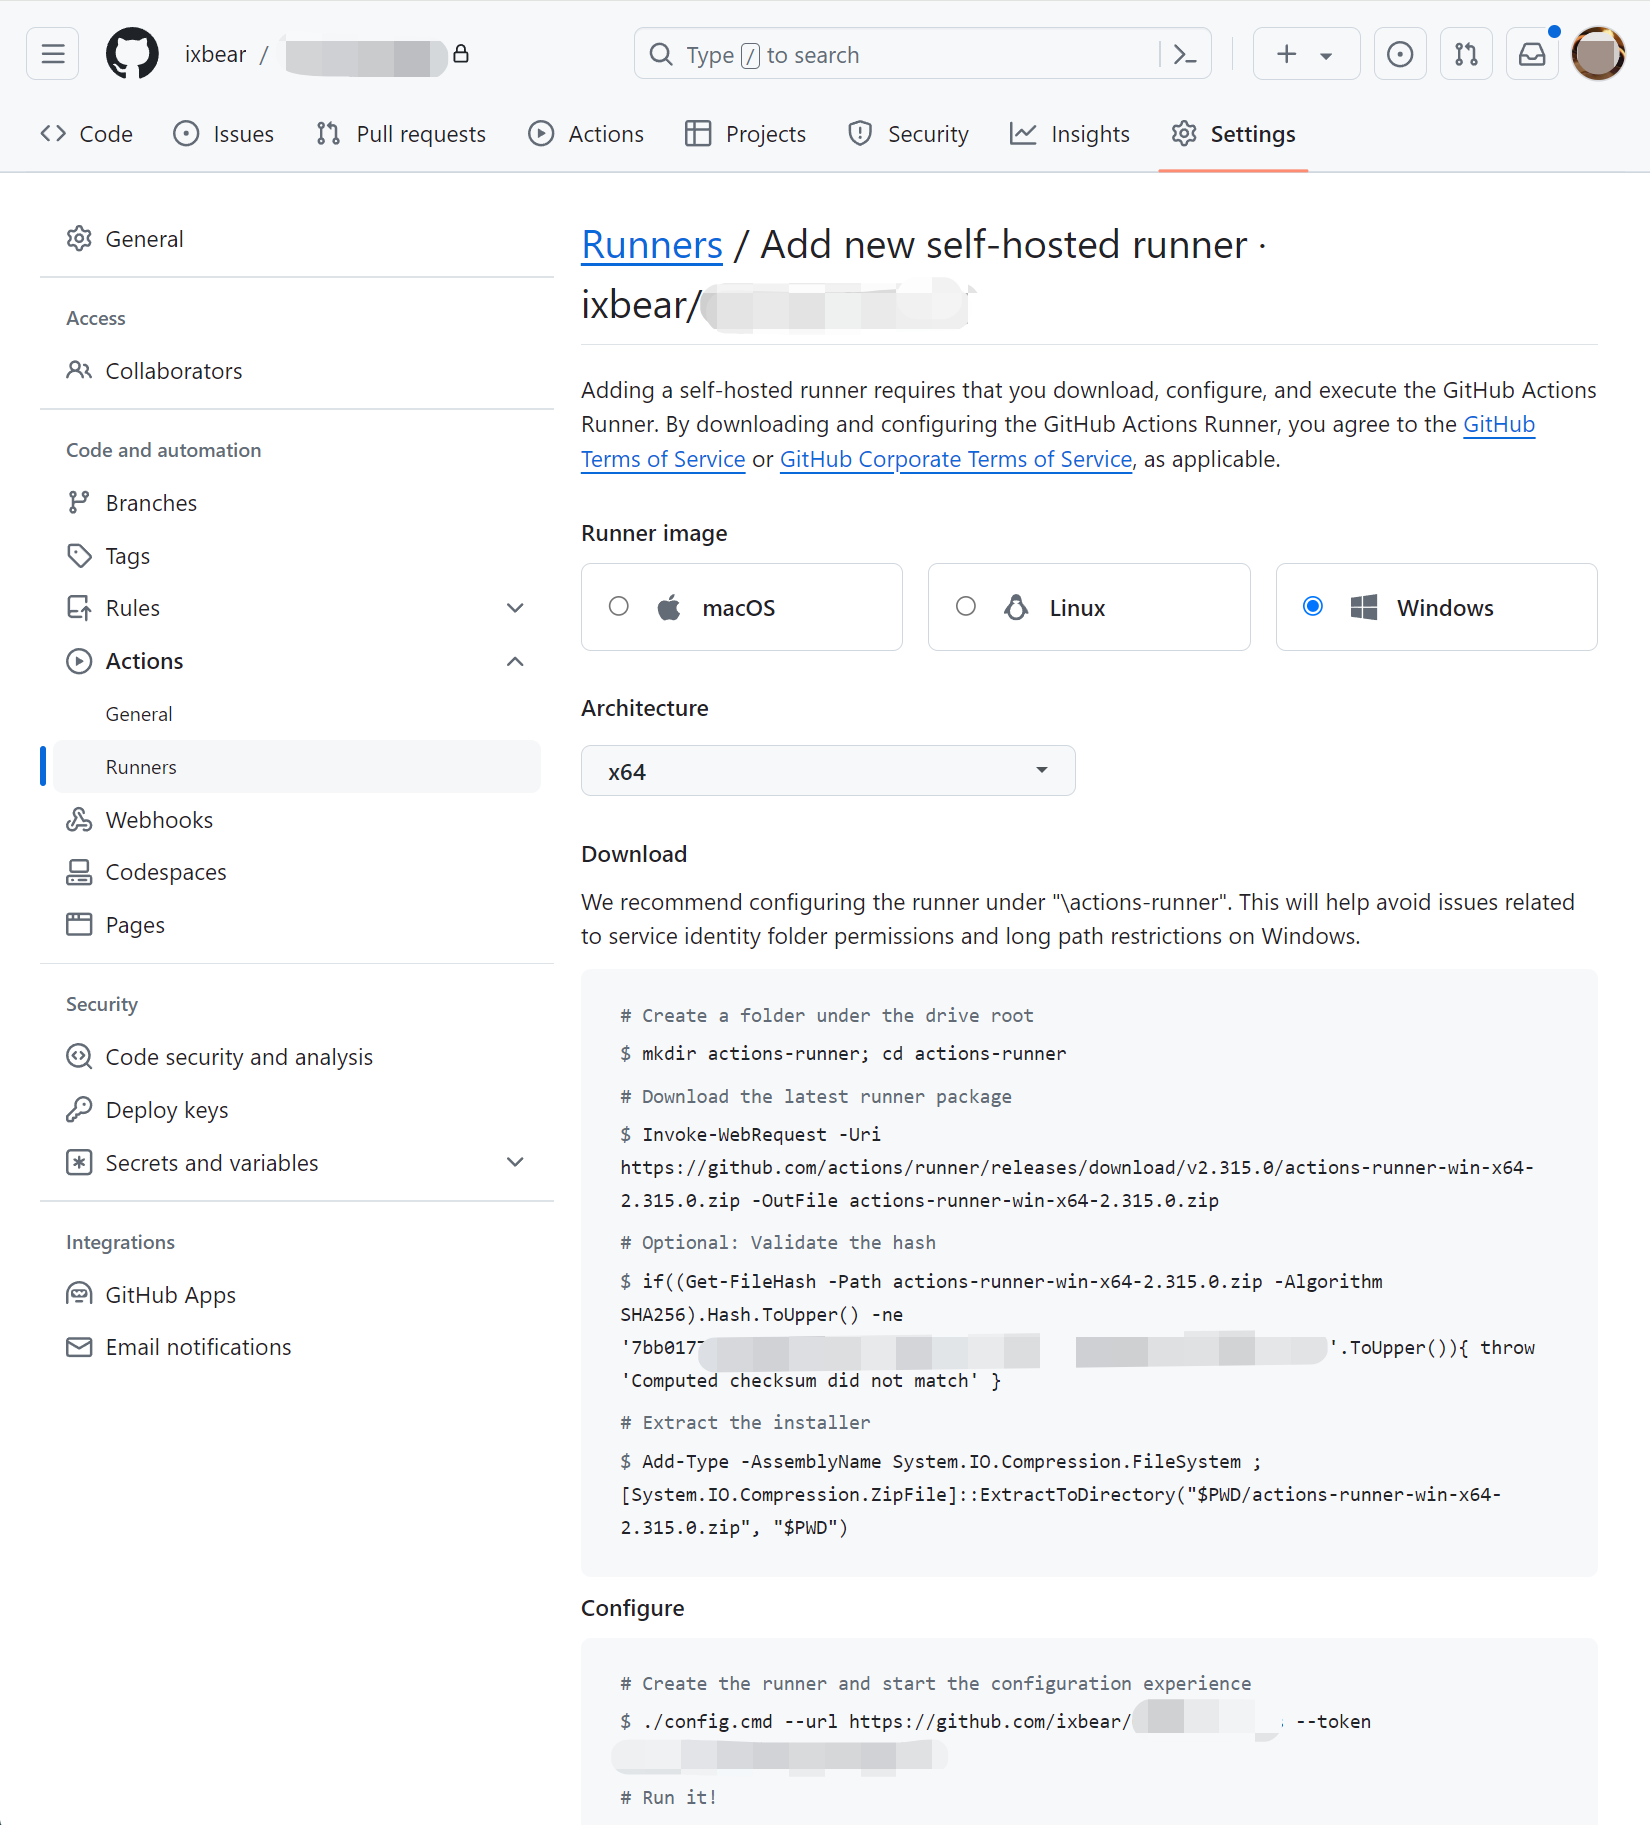
# Save settings
./config.cmd --url https://github.com/XXX/MyApp --token XXXXXXXXX

# Lets's deploy a systemd service
# Refer: https://docs.github.com/en/actions/hosting-your-own-runners/managing-self-hosted-runners/configuring-the-self-hosted-runner-application-as-a-service
sudo ./svc.sh install

Then, we will see these below

Run as user: zhang3
Run as uid: 1000
gid: 1000
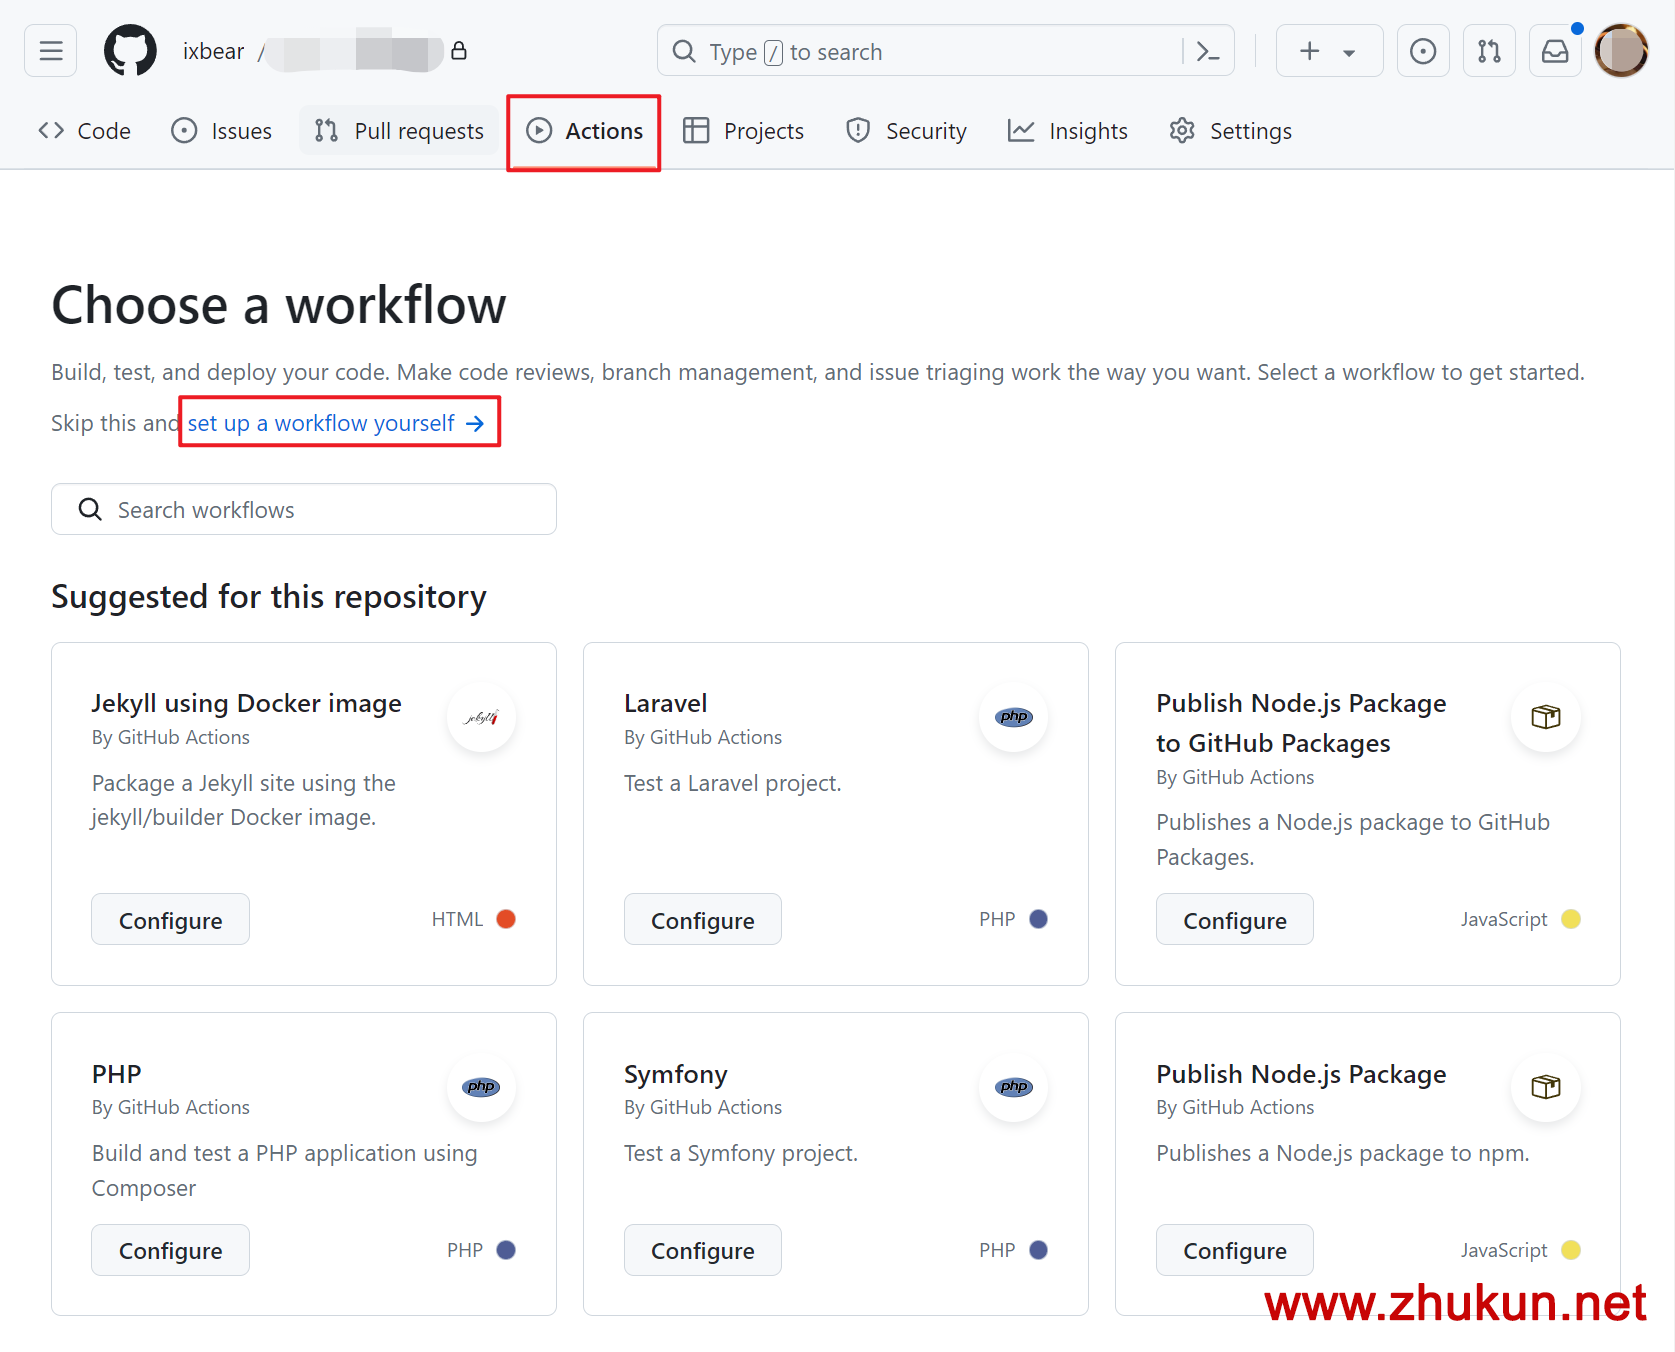
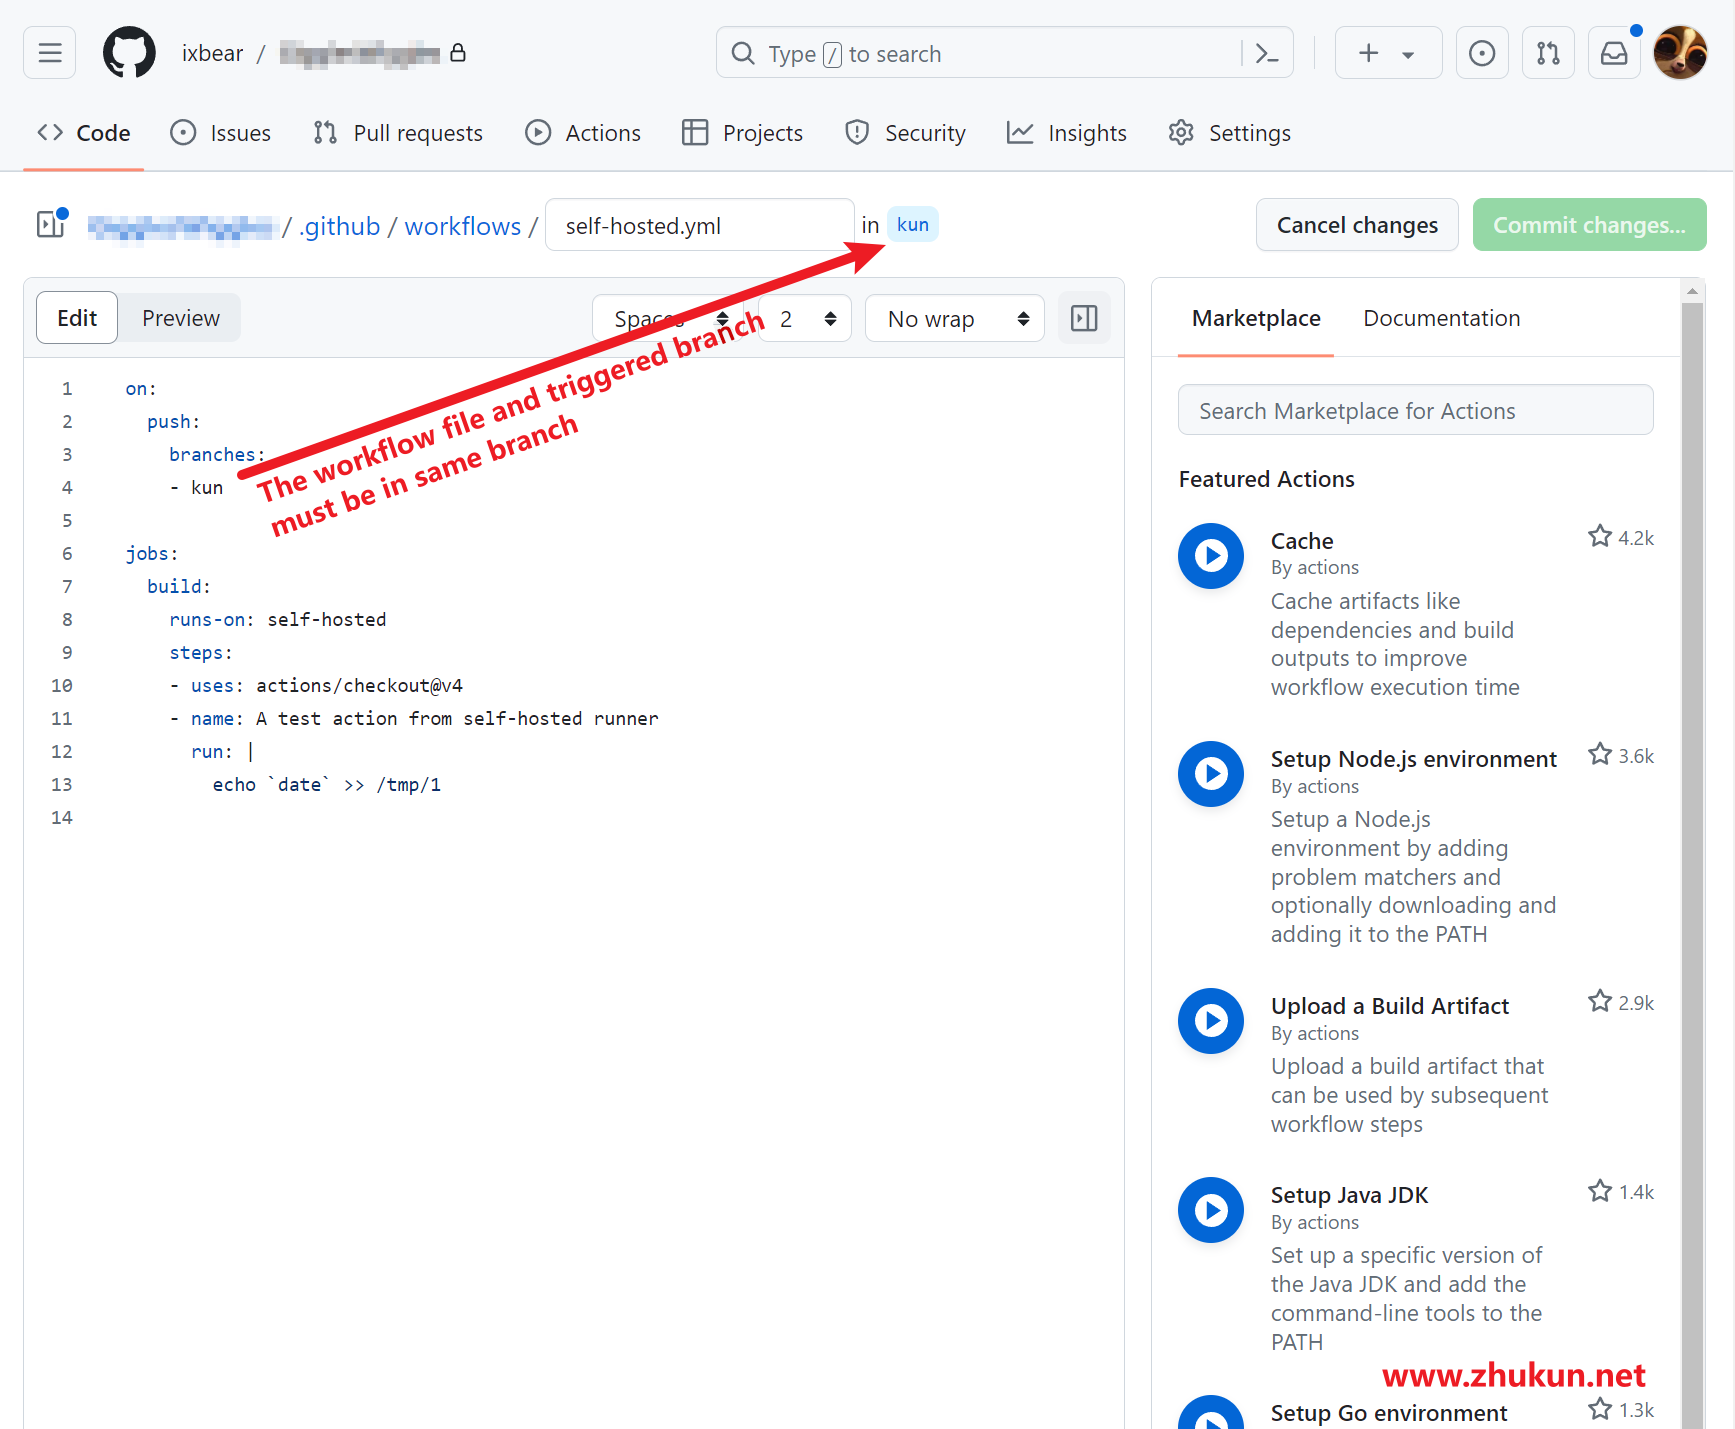
Created symlink /etc/systemd/system/multi-user.target.wants/actions.runner.XXX.service → /etc/systemd/system/actions.runner.XXX.service.

Set up the workflow for our Github Actions

Official Document

https://docs.github.com/en/actions/hosting-your-own-runners/managing-self-hosted-runners/adding-self-hosted-runners

https://docs.github.com/en/actions/hosting-your-own-runners/managing-self-hosted-runners/configuring-the-self-hosted-runner-application-as-a-service

Leave a Comment

Get Ubuntu release code name in Script

$ lsb_release -h
Usage: lsb_release [options]

Options:
  -h, --help         show this help message and exit
  -v, --version      show LSB modules this system supports
  -i, --id           show distributor ID
  -d, --description  show description of this distribution
  -r, --release      show release number of this distribution
  -c, --codename     show code name of this distribution
  -a, --all          show all of the above information
  -s, --short        show requested information in short format


$ lsb_release -a
No LSB modules are available.
Distributor ID:	Ubuntu
Description:	Ubuntu 22.04.3 LTS
Release:	22.04
Codename:	jammy


$ lsb_release -sc
jammy

$ lsb_release -sr
22.04

Use it in Shell Script

echo "deb http://apt.kubernetes.io/ kubernetes-$(lsb_release -sc) main kubernetes-$(lsb_release -sc) main" | sudo tee /etc/apt/sources.list.d/kubernetes.list
Leave a Comment

The easiest way to build a http/ftp server with Python

Build a HTTP Server

# Python2
python -m SimpleHTTPServer PORT

# Python 3
python -m http.server PORT
python -m http.server PORT --bind example.com

Build a FTP Server

pip install pyftpdlib

python -m pyftpdlib -p 21    # notice: it's ftpd, not ftp

# if you want a username and password
python -m pyftpdlib -u USERNAME -P PASSWORD

A powershell script could run in Windows

place a file named “ftp.ps1” with the following content:

Set-ExecutionPolicy RemoteSigned -Scope CurrentUser
Set-Location -Path D:\Download
Start-Process -NoNewWindow python --version
python -m pyftpdlib -p 21 -u USERNAME -P PASSWORD
Read-Host -Prompt "Press Enter to exit"

and then run with Powershell

Advanced Usage

from pyftpdlib.handlers import FTPHandler
from pyftpdlib.servers import FTPServer
from pyftpdlib.authorizers import DummyAuthorizer


authorizer = DummyAuthorizer()
authorizer.add_user('python', '123456', 'F:\\Working~Study', perm='elradfmwM')
handler = FTPHandler
handler.authorizer = authorizer


server = FTPServer(('0.0.0.0', 8888), handler)
server.serve_forever()

Reference
https://blog.51cto.com/phyger/5182139

Leave a Comment

pproxy简单介绍

pproxy是一个简单的小工具, 顾名思议它是一个临时的代理小工具. 下面介绍其使用方法.

安装

服务端和客户端都可以使用如下方式进行安装

pip3 install pproxy

服务端运行

pproxy -l ss://aes-128-gcm:MyPassword@:3389

客户端运行

客户端简单运行

pproxy -r ss://aes-128-gcm:MyPassword@ServerIP:3389 -vv

然后客户端会提示”Serving on :8080 by http,socks4,socks5″.

客户端建立http代理

sudo pproxy -l http://127.0.0.1:8080 -r ss://aes-128-gcm:MyPassword@ServerIP:3389 -vv

然后客户端会提示”Serving on 127.0.0.1:8080 by http”.

客户端建立DNS tunnel

由于ss(AEAD)协议不支持udp, 因此我们只能换用socks5或者tunnel (raw socket)协议来支持udp.

服务端:
pproxy -ul socks5://0.0.0.0:3389

客户端:
sudo pproxy -ul tunnel{8.8.8.8}://127.0.0.1:53 -ur socks5://ServerIP::3389 -vv

然后客户端会提示”Serving on UDP 127.0.0.1:53 by tunnel”, 可以在客户端使用dig @127.0.0.1 dropbox.com检验tunnel效果.

1 Comment

调用Elasticsearch API查询数据, 并将数据导出为csv格式

1, 调用Elasticsearch API查询数据

下面的命令是一条标准的查询语句

curl -XGET http://127.0.0.1:9200/my_index-*/_search -H 'Content-Type: application/json' -d'
{
  "size": 10000,
  "query": {
    "bool": {
      "filter": [
        { "match_all": {} },
        { "match_phrase": { "id": 20202162488675 } },
        { "match_phrase": { "my_site": "www.zhukun.net" } },
        { "match_phrase": { "log_level": "error" } },
        { "range": { "@timestamp": { "gte": "2022-06-09T00:00:00.000+08:00", "lte": "2022-06-09T23:59:59.999+08:00" } } }
      ]
    }
  }
}'

2, 将查询到的数据导出为csv格式

首先, 我们将上面的命令查询的结果重定向到a.json文件中, 然后使用jq命令将json中的数据导出为csv

jq '[ .hits.hits[]._source ] | map(del(.message)) | (map(keys) | add | unique) as $cols | map(. as $row | $cols | map($row[.])) as $rows | $cols, $rows[] | @csv' a.json > a.csv

3, 一些注意事项

3.1 查询命令里的”size”: 10000表示查询结果的最大显示数量, 受到ES的index.max_result_window的限制(默认限制是10000条), 如果要修改此限制可使用如下命令:

curl -XPUT http://127.0.0.1:9200/my_index-*/_settings -H 'Content-Type: application/json' -d'
{
  "index": { "max_result_window": 50000 }
}'

3.2 关于jq命令的用法

  • [ .hits.hits[]._source ]表示将所有结果放在一个list里
  • map(del(.message))表示删除结果里的message这个k-v
  • map(keys) | add | unique表示提取所有的key
Leave a Comment

Ubuntu 20.04上查看HEIC格式的图片/显示缩略图

Ubuntu 20.04上查看HEIC格式的图片, 仅需要安装一个 heif-gdk-pixbuf 的package, 然后就可以使用 Image Viewer 查看了. 如果还需要在文件管理器中显示缩略图, 那么还需要安装其它2个包

sudo apt update
sudo apt install heif-gdk-pixbuf
sudo apt install heif-thumbnailer
sudo apt install libheif1:amd64

参考这篇文章. 如果需要把heic格式的图片转换成jpg, 可以参考这篇文章(未验证).

Leave a Comment

Python农历转换

在Python中进行公历转换农历, 是一件很简单的事儿.

>>> import datetime
>>> from zhdate import ZhDate

# 农历转公历
>>> date = ZhDate(2022,4,5)
>>> print(date)
农历2022年4月5日

>>> date.to_datetime().date().year
2022
>>> date.to_datetime().date().month
5
>>> date.to_datetime().date().day
5
Leave a Comment