L2TP ipsec vpn是PPTP VPN的升级版,似乎是企业专用的。本文的方法在Chicagovps的xen上通过,并能成功联网,而且速度还不错。
环境:CentOS 6,且支持ppp
1、安装基础包
$ yum install -y ppp iptables make gcc gmp-devel xmlto bison flex xmlto libpcap-devel lsof vim-enhanced
$ yum -y install nss-devel nspr-devel pkgconfig pam-devel libcap-ng-devel libselinux-devel curl-devel \
flex bison gcc make fipscheck-devel unbound-devel xmlto
2、下载安装openswan
#openswan is obsoleted by libreswan, trying to install libreswan-3.15-5.3.el6.x86_64 instead
$ yum install libreswan ppp
3、安装xl2tpd
centos 5.x安装:
$ rpm -ivh https://dl.fedoraproject.org/pub/epel/epel-release-latest-5.noarch.rpm
centos 6.x安装:
$ rpm -ivh https://dl.fedoraproject.org/pub/epel/epel-release-latest-6.noarch.rpm
centos 7.x安装:
$ rpm -ivh https://dl.fedoraproject.org/pub/epel/epel-release-latest-7.noarch.rpm

$ yum install xl2tpd
4、修改配置文件
$ cp /etc/ipsec.conf /etc/ipsec.conf.ori
$ vim /etc/ipsec.conf 贴出配置文件,大家直接粘贴进去即可
config setup
    nat_traversal=yes
    virtual_private=%v4:10.0.0.0/8,%v4:192.168.0.0/16,%v4:172.16.0.0/12
    oe=off
    protostack=netkey

conn L2TP-PSK-NAT
    rightsubnet=vhost:%priv
    also=L2TP-PSK-noNAT

conn L2TP-PSK-noNAT
    authby=secret
    pfs=no
    auto=add
    keyingtries=3
    rekey=no
    ikelifetime=8h
    keylife=1h
    type=transport
    left=你的IP地址
    leftprotoport=17/1701
    right=%any
    rightprotoport=17/%any
5、写入预共享的密钥
可能不存在这个文件,不用担心,如果没有就新建
$ cp /etc/ipsec.secrets /etc/ipsec.secrets.ori
$ vim /etc/ipsec.secrets    #写入如下一行
你的IP地址 %any: PSK "密钥"
6、修改/etc/sysctl.conf,添加转发补丁等功能
注意这里的你参照你文件内容的改,没有的添加。
net.ipv4.ip_forward = 1
net.ipv4.conf.all.rp_filter = 0
net.ipv4.conf.default.rp_filter = 0
net.ipv4.conf.lo.rp_filter = 0
net.ipv4.conf.eth0.rp_filter = 0
net.ipv4.conf.default.send_redirects = 0
net.ipv4.conf.default.log_martians = 0
net.ipv4.conf.default.accept_source_route = 0
net.ipv4.conf.default.accept_redirects = 0
net.ipv4.conf.all.send_redirects = 0
net.ipv4.conf.all.log_martians = 0
net.ipv4.conf.all.accept_redirects = 0
net.ipv4.icmp_ignore_bogus_error_responses = 1
修改完成后,运行如下命令使之生效
$ sysctl -p
7、验证ipsec运行
$ ipsec initnss      #初始化NSS数据库

$ ipsec setup restart    #如果这里出现Failed to initialize nss database sql:/etc/ipsec.d则表示未安装NSS相关包

$ ipsec verify    #输出以下内容就表示配置成功了
Verifying installed system and configuration files

Version check and ipsec on-path                   	[OK]
Libreswan 3.15 (netkey) on 4.5.5-x86_64-linode69
Checking for IPsec support in kernel              	[OK]
 NETKEY: Testing XFRM related proc values
         ICMP default/send_redirects              	[OK]
         ICMP default/accept_redirects            	[OK]
         XFRM larval drop                         	[OK]
Pluto ipsec.conf syntax                           	[OK]
Hardware random device                            	[N/A]
Two or more interfaces found, checking IP forwarding	[OK]
Checking rp_filter                                	[OK]
Checking that pluto is running                    	[OK]
 Pluto listening for IKE on udp 500               	[OK]
 Pluto listening for IKE/NAT-T on udp 4500        	[OK]
 Pluto ipsec.secret syntax                        	[OK]
Checking 'ip' command                             	[OK]
Checking 'iptables' command                       	[OK]
Checking 'prelink' command does not interfere with FIPSChecking for obsolete ipsec.conf options          	[OK]
Opportunistic Encryption                          	[DISABLED]
8、编辑 /etc/xl2tpd/xl2tpd.conf
$ cp /etc/xl2tpd/xl2tpd.conf /etc/xl2tpd/xl2tpd.conf.ori
$ vim /etc/xl2tpd/xl2tpd.conf    #直接写入以下内容
[global]
listen-addr = 你的IP地址
port = 1701
auth file = /etc/ppp/chap-secrets

[lns default]
ip range = 10.1.88.2-10.1.88.254
local ip = 10.1.88.1
; leave chap unspecified for maximum compatibility with windows, iOS, etc
; require chap = yes
refuse pap = yes
require authentication = yes
name = l2tpd
ppp debug = yes
pppoptfile = /etc/ppp/options.xl2tpd
length bit = yes
9、编辑 /etc/ppp/options.xl2tpd
$ cp /etc/ppp/options.xl2tpd /etc/ppp/options.xl2tpd.ori
$ vim /etc/ppp/options.xl2tpd    #写入如下内容
ipcp-accept-local
ipcp-accept-remote
ms-dns  8.8.8.8
ms-dns  8.8.4.4
noccp
auth
crtscts
idle 1800
mtu 1356
mru 1356
nodefaultroute
debug
lock
proxyarp
connect-delay 5000
10、设置用户名,密码
$ vim /etc/ppp/chap-secrets
# user server password ip
用户1 l2tpd 密码1 *
用户2 * 密码2 *    #两种写法均可
11、设置防火墙及开机自启动
$ iptables -A INPUT -p udp --dport 500 -j ACCEPT
$ iptables -A INPUT -p udp --dport 4500 -j ACCEPT
$ iptables -A INPUT -p udp -m policy --dir in --pol ipsec -m udp --dport 1701 -j ACCEPT
$ iptables -t nat -A POSTROUTING -s 10.1.88.0/24 -o eth0 -j MASQUERADE
$ service iptables save
$ service iptables restart

$ service xl2tpd restart  #重启xl2tpd
$ chkconfig xl2tpd on
$ chkconfig iptables on
$ chkconfig ipsec on
至此,搭建完成。可见,安装还是比较简单的,比openvpn简单很多。
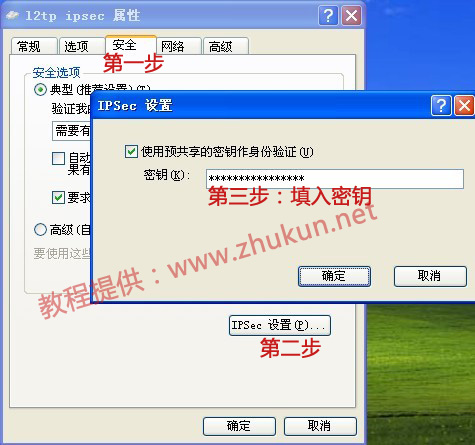
在客户端进行连接的时候,需要对新建立的VPN的属性进行以下设置:
12,解决Windows7/8.1在使用L2TP VPN时的809错误
Windows7/8.1在使用L2TP VPN时,极有可能会遇到809错误。
原因如下:
Windows (Vista, Server 2008, 7, 8.1) operating systems do not support Internet Protocol security (IPsec) network address translation (NAT) Traversal (NAT-T) security associations to servers that are located behind a NAT device. Therefore, if the virtual private network (VPN) server is behind a NAT device, a Windows VPN client computer cannot make a Layer Two Tunneling Protocol (L2TP)/IPsec connection to the VPN server.
Because of the way in which NAT devices translate network traffic, you may experience unexpected results when you put a server behind a NAT device and then use an IPsec NAT-T environment. Therefore, if you need IPsec for communication, we recommend that you use public IP addresses for all servers that you want connect to from the Internet. However, if you have to put a server behind a NAT device and then use an IPsec NAT-T environment, you can enable communication by changing a registry value on the VPN client computer and the VPN server.
解决办法:
“开始”,“运行”,输入“regedit”打开注册表编辑器
展开HKEY_LOCAL_MACHINE\SYSTEM\CurrentControlSet\Services\PolicyAgent
在右侧的空白处右击,“新建”一个“DWORD (32-bit)值”,名称为AssumeUDPEncapsulationContextOnSendRule
右击该值,选择“修改”,将“数值数据”修改为“2”,确定即可
参考文献:
CentOS7 – 搭建IPSec-L2TP VPN
IPsec VPN Server Auto Setup Scripts
简单的我会。ipsec我还没试过。学习了捏。
只有方法,没留帐号。不开心!
乖,摸摸头
设置防火墙有些问题。会导致vpn拨号被服务器防火墙阻止,出现678错误。
vim /etc/sysconfig/iptables 修改里面的规则顺序:行17、18、19一定放在20前面;行21、22放在23前面。
15 -A INPUT -i lo -j ACCEPT
16 -A INPUT -m state –state NEW -m tcp -p tcp –dport 22 -j ACCEPT
17 -A INPUT -m state –state NEW -m udp -p udp –dport 500 -j ACCEPT
18 -A INPUT -m state –state NEW -m udp -p udp –dport 1701 -j ACCEPT
19 -A INPUT -m state –state NEW -m udp -p udp –dport 4500 -j ACCEPT
20 -A INPUT -j REJECT –reject-with icmp-host-prohibited
21 -A FORWARD -s 172.28.255.0/24 -j ACCEPT
22 -A FORWARD -d 173.28.255.0/24 -j ACCEPT
23 -A FORWARD -j REJECT –reject-with icmp-host-prohibited