RedHat5.5配置安装lnmp全过程(Linux+Nginx+Mysql+PHP)
一,安装必要的库和相关软件
# rpm -e mysql-server php-mysql php perl-DBD-MySQL mysql httpd
# yum -y install gcc gcc-c++ autoconf libtool* ncurses-devel pcre-devel zlib-devel libxml2-devel libpng-devel libjpeg-devel-6b freetype-devel gd-devel curl-devel libmcrypt-devel bison

# wget http://www.cmake.org/files/v2.8/cmake-2.8.4.tar.gz   #下载cmake
# tar -zxvf cmake-2.8.4.tar.gz
# cd cmake-2.8.4
# ./configure && make && make install
二,安装mysql (more…)
Read Morelinux系统中通过控制台给其他用户发送消息
向单个用户发送消息 write username
向所有用户发送消息 wall
向其它系统的所有用户发送消息 rwall hostname
回车以后,输入消息内容,输完按Ctrl+D退出。
MySQL Usage
1. Database and User Management
Create Database
# Create a database (replace '<DB NAME>' to your Database name)
CREATE DATABASE <DB NAME> CHARACTER SET utf8mb4 COLLATE utf8mb4_general_ci;


# Delete a database
drop database <DB NAME>;
Create User and Grant Permission
# Create a user and grant the database's permission to it

# MySQL 5.5, 5.6, and 5.7
grant all privileges on <DB NAME>.* to '<USER_NAME>'@'localhost' identified by '<PASSWORD>';
GRANT select,update ON <DB NAME>.* TO '<USER_NAME>'@'localhost' identified by '<PASSWORD>';
flush privileges;


# MySQL 8.0 or later (the use of the IDENTIFIED BY clause with GRANT is deprecated.)
# Instead, you should use CREATE USER and ALTER USER statements to create and modify users
CREATE USER '<USER_NAME>'@'localhost' IDENTIFIED WITH mysql_native_password BY '<PASSWORD>';
GRANT ALL PRIVILEGES ON <DB NAME>.* TO '<USER_NAME>'@'localhost';
flush privileges;


# Delete a user
DELETE FROM mysql.user WHERE User="<USER_NAME>" and Host="localhost";
flush privileges;


# Change Password
update mysql.user set password=password('<NEW_PASSWORD>') where User="<USER_NAME>" and Host="localhost";
flush privileges;
See the User’s Permission
show grants for <USER_NAME>@localhost;2. DATABASE and Table Management
# Check a DB's Charset and Collection
SELECT DEFAULT_CHARACTER_SET_NAME, DEFAULT_COLLATION_NAME
FROM INFORMATION_SCHEMA.SCHEMATA WHERE SCHEMA_NAME = '<DB NAME>';


# Alter a DB's charset and Collection
ALTER DATABASE <DB NAME> CHARACTER SET utf8mb4 COLLATE utf8mb4_general_ci;


# Check the DB size
SELECT table_schema "DB Name",
        ROUND(SUM(data_length + index_length) / 1024 / 1024, 1) "DB Size in MB"
FROM information_schema.tables GROUP BY table_schema;


# Check the Table size (replace myDB with your DB name)
SELECT TABLE_NAME, table_rows, data_length, index_length,
round(((data_length + index_length) / 1024 / 1024),2) "Size in MB"
FROM information_schema.TABLES WHERE table_schema = "<DB NAME>" ORDER BY (data_length + index_length) DESC;


# Optimize Table
OPTIMIZE TABLE <table name>;
OPTIMIZE TABLE <table 1>, <table 2>, <table 3>;

# Optimize Tables Using the Terminal
mysqlcheck -u root -p --auto-repair --optimize --myDB  # For a Single DB
mysqlcheck -u root -p --auto-repair --optimize --all-databases
3. Optimize Table
use <DB NAME>;

# Find tables need to be optimized
select table_name, data_length, data_free from information_schema.tables
where table_schema='<DB NAME>' order by data_free desc;
+-----------------------------------+-------------+-----------+
| table_name                        | data_length | data_free |
+-----------------------------------+-------------+-----------+
| wordpress_commentmeta             |       44028 |     19784 |
| wordpress_comments                |     2005588 |     13024 |
| wordpress_postmeta                |      569124 |       112 |
| wordpress_links                   |        1220 |         0 |
| wordpress_aioseo_posts            |       16384 |         0 |
| wordpress_terms                   |       38876 |         0 |
| wordpress_tla_rss_map             |           0 |         0 |
| wordpress_actionscheduler_groups  |       16384 |         0 |
the output shows some general information about the table. The following two numbers are important:
- Data_length represents the amount of space the database takes up in total.
- Data_free shows the allocated unused bytes within the database table. This information helps identify which tables need optimization and how much space will be released afterward.
optimize table wordpress_commentmeta, wordpress_comments;

# Check tables again
select table_name, data_length, data_free from information_schema.tables
where table_schema='<DB NAME>' order by data_free desc;
+-----------------------------------+-------------+-----------+
| table_name                        | data_length | data_free |
+-----------------------------------+-------------+-----------+
| wordpress_commentmeta             |       44028 |         0 |
| wordpress_comments                |     2005588 |         0 |
| wordpress_postmeta                |      569124 |       112 |
| wordpress_links                   |        1220 |         0 |
| wordpress_aioseo_posts            |       16384 |         0 |
| wordpress_terms                   |       38876 |         0 |
| wordpress_tla_rss_map             |           0 |         0 |
| wordpress_actionscheduler_groups  |       16384 |         0 |
The results of the optimization change the values of data_length and data_free of the optimized table. Both values are lowered, indicating:
1. The optimization freed the unused allocated memory.
2. The overall memory of the database is lower because of the released space.
在CentOS/RedHat中使用bind搭建主域名服务器
在CentOS/RedHat中使用bind搭建主域名服务器,记录一下。
1,安装必要软件
yum install bind bind-utils bind-chroot caching-nameserver -y
其中,bind是主程序,bind-utils提供测试工具(如nslookup等),bind-chroot提供伪装目录增强安全性,caching-nameserver是作为缓存域名服务器的。
安装完成以后,bind在系统中的服务名为named,可以通过以下方式来启动服务:
service named start
或者 /etc/init.d/named start
2,配置
因为安装了bind-chroot,故named的主配置文件位于/var/named/chroot/etc/,但目前没有配置文件,需要手动创建一个 (more…)
Linux模拟硬盘资源耗尽故障
Linux硬盘资源包括[容量]及[文件数量(i节点)]两种,接下来,我们来模拟一下这两种资源分别被耗尽的故障。
环境搭建:
添加一块硬盘sdb,并在其中划分一块15M大小的分区/dev/sdb1,并将分区挂载至/mnt/111下。最后的挂载情况:
[root@localhost ~]# df -m        #查看容量
Filesystem           1M-blocks      Used Available Use% Mounted on
……省略内容
/dev/sdb1                   16         2        14   8% /mnt/111
[root@localhost ~]# df -i        #查看文件数量
Filesystem            Inodes   IUsed   IFree IUse% Mounted on
……省略内容
/dev/sdb1               4016      11    4005    1% /mnt/111
1,模拟文件数量(i节点)耗尽故障
首先写一段bash脚本1.sh,不停地向分区系统里写入空文件。脚本内容如下: (more…)
Linux不重启识别新添加的磁盘
众所周知,VMWare可以在线为linux添加磁盘,但是添加磁盘过后,一般linux需要重新启动才可以识别新增加的磁盘。一直以来,在添加硬盘的时候下面这条提示让我很疑惑,根据多年经验,这里一定有玄机,后来上百度Google了一下,让我发现了不重启就能识别新添加的硬盘的方法。
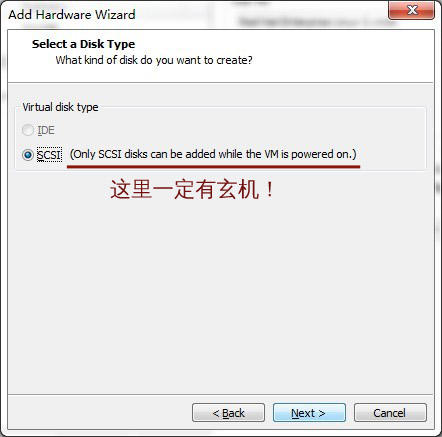
1、在开机状态下新增磁盘
2、执行下面的命令
echo "- - -" > /sys/class/scsi_host/host0/scan然后再运行fdisk -l就能发现新添加的硬盘已经被系统识别了,查看系统日志/var/log/messages,发现对SCSI设备进行了一次重新扫描
注意:三个- – -号之间有空隔。 (more…)