Press "Enter" to skip to content

Tag: centos

调用Elasticsearch API查询数据, 并将数据导出为csv格式

1, 调用Elasticsearch API查询数据

下面的命令是一条标准的查询语句

curl -XGET http://127.0.0.1:9200/my_index-*/_search -H 'Content-Type: application/json' -d'
{
  "size": 10000,
  "query": {
    "bool": {
      "filter": [
        { "match_all": {} },
        { "match_phrase": { "id": 20202162488675 } },
        { "match_phrase": { "my_site": "www.zhukun.net" } },
        { "match_phrase": { "log_level": "error" } },
        { "range": { "@timestamp": { "gte": "2022-06-09T00:00:00.000+08:00", "lte": "2022-06-09T23:59:59.999+08:00" } } }
      ]
    }
  }
}'

2, 将查询到的数据导出为csv格式

首先, 我们将上面的命令查询的结果重定向到a.json文件中, 然后使用jq命令将json中的数据导出为csv

jq '[ .hits.hits[]._source ] | map(del(.message)) | (map(keys) | add | unique) as $cols | map(. as $row | $cols | map($row[.])) as $rows | $cols, $rows[] | @csv' a.json > a.csv

3, 一些注意事项

3.1 查询命令里的”size”: 10000表示查询结果的最大显示数量, 受到ES的index.max_result_window的限制(默认限制是10000条), 如果要修改此限制可使用如下命令:

curl -XPUT http://127.0.0.1:9200/my_index-*/_settings -H 'Content-Type: application/json' -d'
{
  "index": { "max_result_window": 50000 }
}'

3.2 关于jq命令的用法

  • [ .hits.hits[]._source ]表示将所有结果放在一个list里
  • map(del(.message))表示删除结果里的message这个k-v
  • map(keys) | add | unique表示提取所有的key
Leave a Comment

内网穿透: 使用ssh tunnel将内网主机映射到公网

如果希望将一台内网中的主机发布到公网(使用阿里云/腾讯云中转的方式), 使得该内网主机可以在全球任意地点被访问, 仅需要用到ssh即可. 用到的原理就是ssh的remote port forwarding特性, 具体可参考本博客之前写的简单解释 ssh 中的 local port forwarding 和 remote port forwarding.

假设我们已经有了一台阿里云/腾讯云的主机, 其公网IP是1.1.1.1, 需要在ssh配置里启用GatewayPorts(否则ssh tunnel建立以后只会监听127.0.0.1)

在我们的内网主机上写入一个systemd服务

sudo vim /etc/systemd/system/[email protected]    # 写入如下内容
[Unit]
Description=Persistent SSH Tunnel to from port 127.0.0.1:%i on this server to port 3389 on external server(1.1.1.1:3389)
After=network.target
 
[Service]
Environment="LOCAL_PORT=%i"
ExecStart=/usr/bin/ssh -NTC -o ServerAliveInterval=60 -o ExitOnForwardFailure=yes -R 3389:0.0.0.0:${LOCAL_PORT} [email protected]
Restart=on-failure
RestartSec=5

[Install]
WantedBy=multi-user.target

参数解释:
T: 禁止分配伪终端
N: 不执行远程指令
C: 请求压缩所有数据

然后启用服务

sudo systemctl daemon-reload
sudo systemctl enable ssh-tunnel@22 --now

然后就可以通过1.1.1.1:3389来访问这台内网主机的22端口了.

参考文档: README-setup-tunnel-as-systemd-service.md

2 Comments

CentOS 7解决arp欺骗

某天发现一台CentOS机器网络一切正常, 但是却无法正常上网. 后经查询, 发现该机器的网关mac地址与实际网关的mac地址不符.  下面是查看和解决办法.

查看arp

$ cat /proc/net/arp 
IP address       HW type     Flags       HW address            Mask     Device
192.168.43.62    0x1         0x2         24:6e:96:93:c9:7d     *        eth0
192.168.43.61    0x1         0x2         24:6e:96:8c:e0:65     *        eth0
192.168.43.154   0x1         0x0         00:00:00:00:00:00     *        eth0
192.168.43.153   0x1         0x2         52:54:00:fa:bb:fc     *        eth0
192.168.43.60    0x1         0x0         00:00:00:00:00:00     *        eth0
192.168.43.59    0x1         0x0         00:00:00:00:00:00     *        eth0
192.168.43.151   0x1         0x2         52:54:00:aa:73:e2     *        eth0
192.168.43.11    0x1         0x0         00:00:00:00:00:00     *        eth0
192.168.43.31    0x1         0x2         00:be:75:c7:47:ea     *        eth0
192.168.43.111   0x1         0x0         00:00:00:00:00:00     *        eth0
192.168.43.27    0x1         0x2         52:54:00:b4:3f:a3     *        eth0
192.168.43.224   0x1         0x0         00:00:00:00:00:00     *        eth0
192.168.43.26    0x1         0x2         52:54:00:33:50:7e     *        eth0
192.168.43.223   0x1         0x0         00:00:00:00:00:00     *        eth0
192.168.43.25    0x1         0x2         52:54:00:b4:3f:a3     *        eth0
192.168.43.1     0x1         0x2         3c:f5:cc:91:79:87     *        eth0
192.168.43.163   0x1         0x2         52:54:00:78:13:7d     *        eth0
192.168.43.162   0x1         0x2         52:54:00:7f:83:a4     *        eth0
192.168.43.104   0x1         0x2         52:54:00:34:0c:fc     *        eth0
192.168.43.21    0x1         0x0         00:00:00:00:00:00     *        eth0
192.168.43.44    0x1         0x2         24:6e:96:93:a3:c4     *        eth0
192.168.43.43    0x1         0x2         24:6e:96:8c:df:64     *        eth0
192.168.43.158   0x1         0x2         52:54:00:9a:ff:9f     *        eth0
192.168.43.122   0x1         0x2         52:54:00:99:e5:5e     *        eth0


$ arp -a
? (192.168.43.62) at 24:6e:96:93:c9:7d [ether] on eth0
? (192.168.43.61) at 24:6e:96:8c:e0:65 [ether] on eth0
? (192.168.43.154) at <incomplete> on eth0
? (192.168.43.153) at 52:54:00:fa:bb:fc [ether] on eth0
? (192.168.43.60) at <incomplete> on eth0
? (192.168.43.59) at <incomplete> on eth0
? (192.168.43.151) at 52:54:00:aa:73:e2 [ether] on eth0
? (192.168.43.11) at <incomplete> on eth0
? (192.168.43.31) at 00:be:75:c7:47:ea [ether] on eth0
? (192.168.43.111) at <incomplete> on eth0
? (192.168.43.27) at 52:54:00:b4:3f:a3 [ether] on eth0
? (192.168.43.224) at <incomplete> on eth0
? (192.168.43.26) at 52:54:00:33:50:7e [ether] on eth0
? (192.168.43.223) at <incomplete> on eth0
? (192.168.43.25) at 52:54:00:b4:3f:a3 [ether] on eth0
gateway (192.168.43.1) at 3c:f5:cc:91:79:87 [ether] on eth0
? (192.168.43.163) at 52:54:00:78:13:7d [ether] on eth0
? (192.168.43.162) at 52:54:00:7f:83:a4 [ether] on eth0
? (192.168.43.104) at 52:54:00:34:0c:fc [ether] on eth0
? (192.168.43.21) at <incomplete> on eth0
? (192.168.43.44) at 24:6e:96:93:a3:c4 [ether] on eth0
? (192.168.43.43) at 24:6e:96:8c:df:64 [ether] on eth0
? (192.168.43.158) at 52:54:00:9a:ff:9f [ether] on eth0

绑定arp

绑定arp的过程在某些国外网站称之为Create a Static ARP Table. 下面演示手动绑定网关192.168.43.1的mac地址为74:ea:c8:2d:9f:f6

arp -s 192.168.43.1 74:ea:c8:2d:9f:f6


Leave a Comment

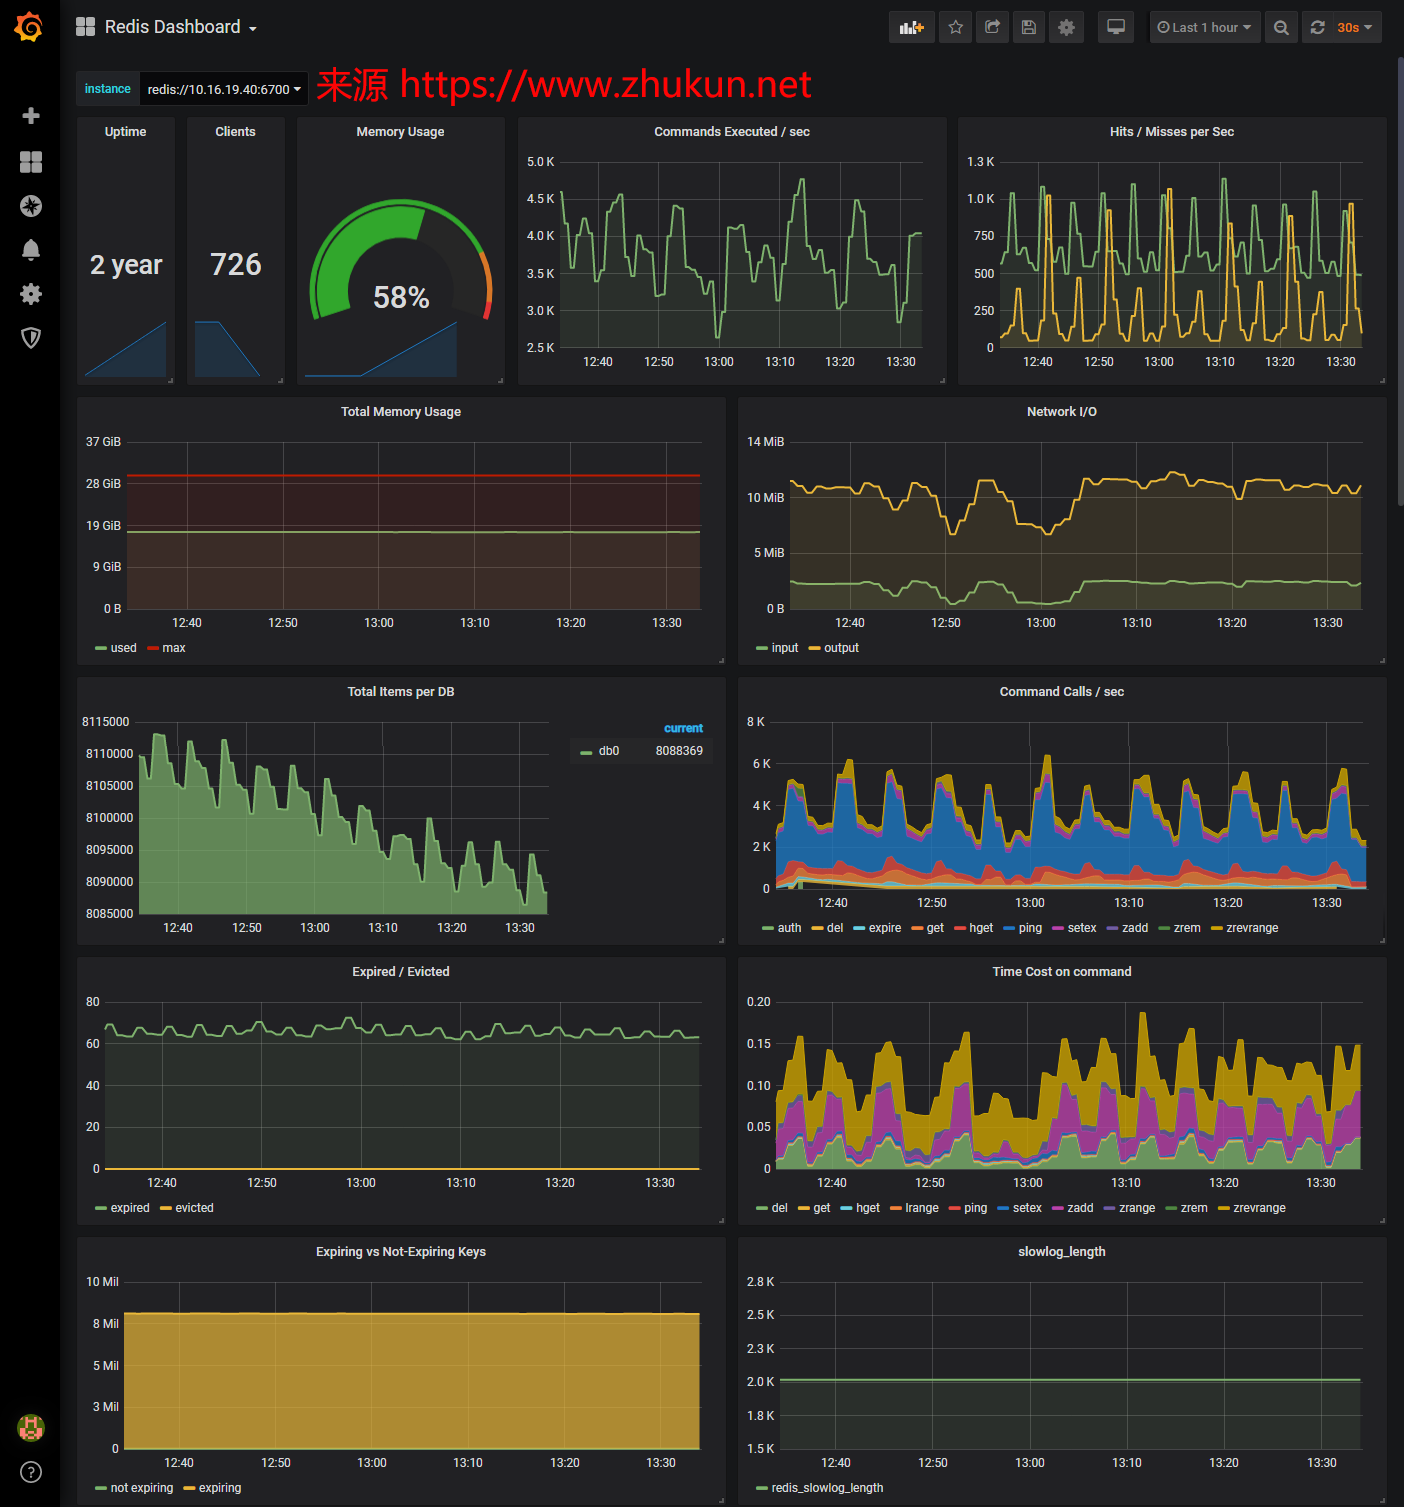
Redis监控(Grafana+Prometheus+redis_exporter)

先看一下最终的效果图(本文中的图片均可以点击查看大图)
Redis监控(Grafana+Prometheus+redis_exporter)

环境准备

Promethus推荐的Exporter: https://prometheus.io/docs/instrumenting/exporters/

其推荐的是这个redis_exporter: https://github.com/oliver006/redis_exporter, 本文略过了Grafana+Prometheus+redis_exporter的安装过程, 我们假设redis_exporter的安装位置为/data/apps/redis_exporter/redis_exporter

查看每个机器上Redis的连接密码

$ grep requirepass /data/conf/redis/redis-670*.conf | grep -v '\#'

要监控的机器redis节点

此组redis密码:K8aBe56E         此组redis密码:uizJFaP9
10.16.19.37:6700              10.16.19.37:6703
10.16.19.37:6701              10.16.19.37:6704
10.16.19.37:6702              10.16.19.37:6705 
10.16.19.40:6700              10.16.19.40:6703
10.16.19.40:6701              10.16.19.40:6704
10.16.19.40:6702              10.16.19.40:6705
10.16.19.58:6700              10.16.19.58:6703
10.16.19.58:6701              10.16.19.58:6704
10.16.19.58:6702              10.16.19.58:6705
2 Comments

从宿主机获得Docker内部IP

在Docker内部获取IP

Docker内部里面,ipconfig/ip 等命令是无法使用的,正确的命令是

$ hostname -I
172.24.116.11

在宿主机获得Docker的IP

假设你已经有了一个Docker,ID是f864187a2406

$ docker inspect -f '{{range .NetworkSettings.Networks}}{{.IPAddress}}{{end}}' f864187a2406
172.24.116.11

$ docker inspect --format '{{ .NetworkSettings.IPAddress }}' f864187a2406
172.24.116.11

$ docker inspect f864187a2406 | egrep -e "(IPAddress|Id)"
        "Id": "f864187a24065636dc0cf9e87bdf2971fea27d4014cf981eaac6b971506b2776",
                "deployId": "8747",
            "SecondaryIPAddresses": null,
            "IPAddress": "172.24.116.11",
                    "IPAddress": "172.24.116.11",
Leave a Comment

Prometheus的label处理

Prometheus能否在查询的时候对label进行2次处理呢?答案是可以的。Prometheus提供了一系列函数可以在Query的时候进行二次处理,本文要介绍的函数是label_replace()。

我们都知道,在 Prometheus 的配置文件里,不论targets里的ip是否带了:9100,最终形成的instance里面都会给你带上这个端口,形成像192.168.1.1:9100这样的格式。这个 instance本身就是一个 Prometheus 内置的label(这里指192.168.1.1:9100)。今天我们演示一下把讨厌的:9100去掉。

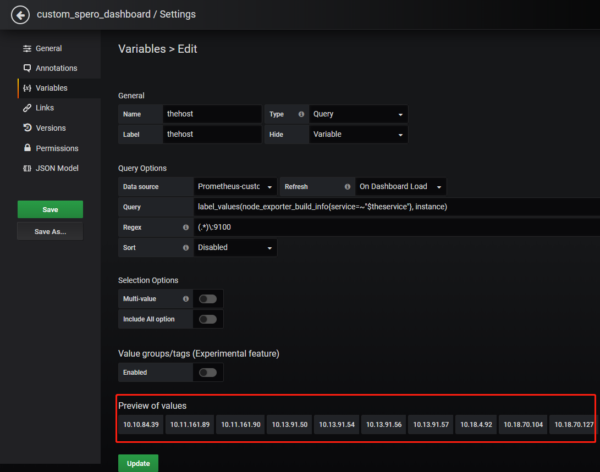
虽然我们也可以使用Variables功能来对instance进行正则化处理(如下图),但是处理以后的结果,在dashboard里面无法选中单个主机。因此这种方法是有bug的(不推荐使用)。

 使用Variables功能来对instance进行正则化处理
使用Variables功能来对instance进行正则化处理
Leave a Comment

Prometheus add custom exporter

Prometheus(中文名:普罗米修斯)是由SoundCloud开发的开源监控报警系统和时序列数据库(TSDB). 使用Go语言开发, 基本原理是通过HTTP协议周期性抓取被监控组件的状态. Prometheus获取数据的策略是Pull而不是Push, 也就是说, 它会自己去抓取, 而不用你来推送. 抓取使用的是HTTP协议, 在配置文件中指定目标程序的端口, 路径及间隔时间即可.

目前互联网公司常用的组件大部分都有exporter可以直接使用, 比如Varnish、Haproxy、Nginx、MySQL、Linux系统信息(包括磁盘、内存、CPU、网络等等).

当Prometheus的node_exporter中没有我们需要的一些监控项时,就可以如zabbix一样添加一些自定义的metrics,让其支持我们所需要的监控项。node_exporter 可在启动时指定路径,并将该路径下的 *.prom 识别为监控数据文件。

准备获取metrics的脚本

$ cat /opt/monitor/get_info.sh
#! /bin/bash

echo Logical_CPU_core_total  `cat /proc/cpuinfo| grep processor| wc -l`
echo logined_users_total     `who | wc -l`;
echo procs_total `ps aux|wc -l`
echo procs_zombie       `ps axo pid=,stat=|grep Z|wc -l`

测试脚本执行情况

$ bash get_info.sh
Logical_CPU_core_total 2
logined_users_total 1
procs_total 148
procs_zombie 0

设置定时任务

* * * * * bash /opt/monitor/get_info.sh > /opt/monitor/get_info.prom

启动 node_exporter

启动 node_exporter 时指定*.prom 数据文件的路径

./node_exporter --collector.textfile.directory=/opt/monitor/

验证metrics

$ curl 127.0.0.1:9100/metrics|grep -E Logical_CPU_core_total|logined_users_total|procs_total|procs_zombie
# TYPE Logical_CPU_core_total untyped
Logical_CPU_core_total 2
# HELP logined_users_total Metric read from /opt/monitor/get_info.prom
# TYPE logined_users_total untyped
logined_users_total 1
# HELP procs_total Metric read from /opt/monitor/get_info.prom
# TYPE procs_total untyped
procs_total 151
# HELP procs_zombie Metric read from /opt/monitor/get_info.prom
# TYPE procs_zombie untyped
procs_zombie 0

参考文档:
Prometheus 自定义exporter 监控key

Leave a Comment