Press "Enter" to skip to content

Category: Linux运维

Linux,unix,mysql,database,oracle,mysql

Linux下的网络监控工具

Linux下的网络流量监控工具,这里推荐两个:ifstat和iftop。其中,ifstat适合查看所有网卡的总吞吐量,而iftop适合查看某一块网卡的连接流量,比如想看看某个IP占用了多少带宽,iftop再适合不过了。

一,ifstat介绍及用法
安装

$ yum install ifstat             #适用于centos/redhat,需先安装rpmforge源
$ sudo apt-get install ifstat    #适用于debian/ubuntu

需要注意的是,CentOS/Redhat上面安装ifstat需要先安装rpmforge源,安装方法请参考这篇文章

用法

$ ifstat -a
        lo                 eth0                eth1                eth2
 KB/s in  KB/s out   KB/s in  KB/s out   KB/s in  KB/s out   KB/s in  KB/s out
    0.00      0.00      0.80      0.80    228.51    253.87      0.00      0.00
    0.00      0.00      0.15      1.66    195.24    290.59      0.00      0.00
    0.00      0.00      0.90      0.96    188.68    265.57      0.00      0.00

二,iftop介绍及用法
安装

$ yum install iftop             #适用于centos/redhat
$ sudo apt-get install iftop    #适用于debian/ubuntu
Leave a Comment

解决Ubuntu提示500 OOPS: vsftpd: refusing to run with writable root inside chroot()

Ubuntu 12.04 64bit系统下安装的vsftpd,在登陆时提示500 OOPS: vsftpd: refusing to run with writable root inside chroot()。根本原因在于,从vsftpd_2.3.5版开始,取消了根目录的可写权限。因此,网上的普遍解决方案是以下两种:

方案一
$ chmod a-w /vaf/ftp

方案二
$ vim /etc/vsftpd.conf add the following
  allow_writeable_chroot=YES

看起来,貌似第二种方式是更完美,但当我把allow_writeable_chroot=YES配置项加入的时候,重启vsftpd服务的时候发现不能正常工作了(21端口无程序在监听),于是上网查找解决方案,发现说法五花八门的,有人说配置项是allow_writable_chroot(少了个e),还有说配置项是allow_writable_root(少了ch)等的,经过我测试,发现全都不行。后来总算找到一个可行的方法。

Ubuntu 12.04 64bit的完整解决方案

$ apt-get install python-software-properties
$ sudo add-apt-repository ppa:thefrontiergroup/vsftpd
$ sudo apt-get update
$ sudo apt-get install vsftpd
$ vim /etc/vsftpd.conf and add the following
  chroot_local_user=YES
  allow_writeable_chroot=YES
$ sudo service vsftpd restart
5 Comments

CentOS 6配置SFTP

现在的客户还真聪明,知道FTP不安全,非要配置个SFTP,于是便有了本文。其实俺特别想说,身在天朝,还谈啥安全?

由于SFTP是SSH的一部分(与传统的FTP没有任何关系),因此,配置SFTP不需要传统的FTP服务器软件。仅需要OpenSSH服务器即可。

$ yum install openssh-server openssl

$ cp /etc/ssh/sshd_config /etc/ssh/sshd_config.bak
$ vim +132 /etc/ssh/sshd_config 
注释掉下面这行
Subsystem      sftp    /usr/libexec/openssh/sftp-server

添加如下几行
Subsystem       sftp    internal-sftp
Match Group sftp
        ChrootDirectory /data/sftp/%u
        ForceCommand    internal-sftp
        AllowTcpForwarding no
        X11Forwarding no

解释一下每一行的意思

Subsystem       sftp    internal-sftp  
这行指定使用sftp服务使用系统自带的internal-sftp

Match Group sftp  
匹配sftp组的用户,如果有多个组用逗号分割
也可以使用“Match User mysftp”匹配用户,多个用户之间也是用逗号分割

ChrootDirectory /data/ftp/%u  
用chroot将用户的根目录指定到/data/ftp/%u,%u代表用户名,%h表示用户根目录
另一种写法: ChrootDirectory %h
chroot可以参考:http://www.ibm.com/developerworks/cn/linux/l-cn-chroot/

ForceCommand    internal-sftp  
指定sftp命令

AllowTcpForwarding no  
X11Forwarding no  
禁止用户使用端口转发

建立用户和组

$ mkdir -p /data/sftp/
$ groupadd sftp
$ useradd -m -d /data/sftp/user1 -g sftp -s /sbin/nologin user1
#通过上面这条命令建立的用户,其家目录权限是700,需要改成755才可以正常登陆
$ chmod -R 755 /data/sftp/
$ chown root:sftp /data/sftp/
$ chown root:sftp /data/sftp/user1    #重要

错误的目录权限设定会导致在log中出现”fatal: bad ownership or modes for chroot directory XXXXXX”的内容

目录的权限设定有两个要点:
1、由ChrootDirectory指定的目录开始一直往上到系统根目录为止的目录拥有者都只能是root
2、由ChrootDirectory指定的目录开始一直往上到系统根目录为止都不可以具有群组写入权限(最大权限755)

因为用了chroot,所以/data/sftp/user1属主一定要是root,并且所属组不能有写入权限,如果上传需要写入在/data/sftp/user1下建立可写属主的文件夹供上传使用。

$ mkdir /data/sftp/user1/upload
$ chown -R user1:sftp /data/sftp/user1/upload

===========================================
2015.01.12补充
在Ubuntu 12.04 64bit系统部按如上方法部署好了SFTP,发现无法登陆,后来在/var/log/auth.log中发现了日志:fatal: bad ownership or modes for chroot directory component “/ftpdata/ftp/”;
于是查看了一下/ftpdata/ftp/的权限,发现该目录的属主是ftp。于是立即将属主修改为root,再次登陆就没问题了
请注意,在Ubuntu系统下,“Match Group sftp”及以后的配置项要写在“UsePAM yes”之后,否则同样无法登陆

===========================================
2015.02.03补充
在Ubuntu 12.04 64bit系统部按如上方法部署好了SFTP,发现无法登陆,FileZilla提示:Received unexpected end-of-file from SFTP server;执行/etc/init.d/ssh restart也不行;
经过百度,发现执行一下initctl restart ssh就OK了

1 Comment

Linux网络诊断工具:MTR

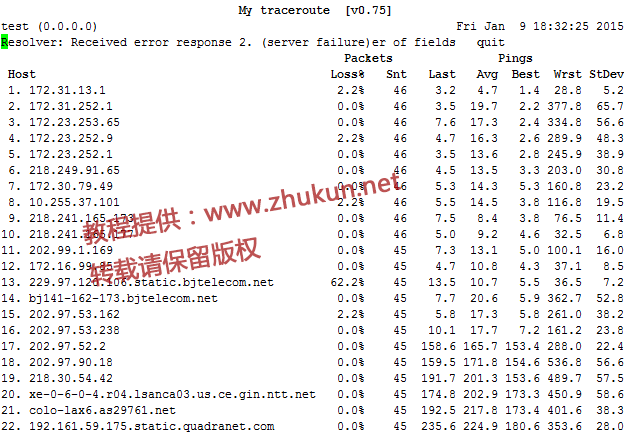
MTR是Linux平台上一款非常好用的网络诊断工具,集成了traceroute、ping、nslookup的功能,用于诊断网络状态非常有用。下面请看简单介绍。

一,安装

$ yum install mtr             #适用于centos
$ sudo apt-get install mtr    #适用于debian/ubuntu

二,用法简介

$ mtr IP或域名

MTR用法简介
第一列(Host):IP地址和域名,按n键可以切换IP和域名
第二列(Loss%):丢包率
第三列(Snt):设置每秒发送数据包的数量,默认值是10 可以通过参数-c来指定
第四列(Last):最近一次的PING值
第五、六、七列(Avg、Best、Wrst):分别是PING的平均、最好、最差值
第八列(StDev):标准偏差

Leave a Comment

Fedora21系统中为ibus添加五笔输入法

Fedora21系统中为ibus添加五笔输入法,其实过程很简单。

1,安装五笔输入法

$ sudo yum list | grep wubi               #查看有哪些五笔输入法
ibus-table-chinese-wubi-haifeng.noarch  1.4.6-2.fc19                     fedora 
ibus-table-chinese-wubi-jidian.noarch   1.4.6-2.fc19                     fedora 

$ sudo yum install ibus-table-chinese-wubi-haifeng   #安装海峰五笔

貌似海峰五笔比极点五笔好用一些。极点五笔把tfrc打出了“造反”,而海峰五笔可以同时打出为“造反”和“选择”。
(补充:发现极点五笔确实很差,ykkl无法打出“识别”)
另外,安装完需要重启一下,然后第二步操作的时候,系统里才能识别出来海峰五笔。

2,设置五笔输入法

Fedora21系统中为ibus添加五笔输入法

Fedora21系统中为ibus添加五笔输入法

Fedora21系统中为ibus添加五笔输入法

Fedora21系统中为ibus添加五笔输入法

对于中国用户来说,应该是非常习惯使用Ctrl+Shift来切换输入法吧。在gnome-tweak-tool里稍微设置一下就好了,见下图:
Fedora21系统中为配置输入法快捷键

=================================================

2015.12.11补充
Fedora23里的新版已经无法通过gnome-tweak-tool来设置Ctrl+Shift快捷键了,可以在Gnome3的“终端”里(注意不能用SSH远程登陆执行),运行如下命令

gsettings set org.gnome.desktop.wm.keybindings switch-input-source "['<Ctrl>Shift_L', '<Ctrl>Shift_R']"
37 Comments

OpenVPN配置静态密钥(static-key)验证

由于OpenVPN的证书方式采用了TLS握手机制,而TLS已经受到严重干扰(不论是TCP还是UDP),已不能在在国内使用。但OpenVPN还可以采用静态密钥(static-key)的方式,相对于证书方式,static-key不需要TLS握手,不易被干扰,缺点也显而易见,那就是只能配置一对一的网络,如果要配置一对多的网络,需要启动多个OpenVPN进程。

一,服务端设置
生成static-key,并在配置文件中启用之

$ openvpn --genkey --secret static.key

然后把static.key和主配置文件放入同一目录

$ vim /etc/openvpn/server.conf  #配置主配置文件如下
dev tun
port 8899
proto tcp-server
ifconfig 10.152.10.1 10.152.10.2
secret static.key
 
keepalive 10 60
comp-lzo
persist-key
persist-tun
status /var/log/openvpn/openvpn-status.log
log /var/log/openvpn/openvpn.log
verb 4
push "redirect-gateway def1 bypass-dhcp" 

由于OpenVPN默认使用UDP的方式传输,如果想改用TCP方式,需要加上“proto tcp-server”一行(这里未启用,已经使用分号注释掉了);
这里我去掉了push dns的配置项,因为客户端总是无法接收到PUSH过来的dns option,原因未知,所以干脆把DNS写进客户端的配置文件算了

Leave a Comment

CentOS6系统openssl生成证书和自签证书

CentOS6系统openssl生成证书和自签证书的过程,记录一下,本文基于CentOS 6 64bit。

$ yum install openssl openssl-devel

1,生成服务器端的私钥(key文件)

$ openssl genrsa -des3 -out server.key 1024

此时会提示输入密码(PEM pass phrase,必须输入),此密码用于加密key文件(参数des3便是指加密算法)。
以后每当需读取此文件(通过openssl提供的命令或API)都需输入密码(PEM pass phrase)。例如把key文件引入Nginx等第三方软件配置https,在启动Nginx的时候同样会要求输入密码。
如果觉得不方便,也可以去除这个密码,但一定要采取其他的保护措施

去除key文件的密码:openssl rsa -in server.key -out server.key

2,生成Certificate Signing Request(CSR)

$ openssl req -new -key server.key -out server.csr -config /etc/pki/tls/openssl.cnf

生成的csr文件交给CA签名后形成服务端自己的证书。屏幕上将有提示,依照其指示一步一步输入要求的个人信息即可

Leave a Comment