Press "Enter" to skip to content

Month: February 2020

Logstash对Field进行简单数学计算

Logstash解析出Field以后, 可以使用filter的ruby插件进行简单数学计算/大小写转换等操作(官方介绍地址), 下面是配置

input {
  kafka{
    bootstrap_servers => ["www.hizy.net:6667,www.xpdo.net:6667","www.zhukun.net:6667"]
    client_id => "logstash_www.xpdo.net"
    group_id => "www.zhukun.net"
    auto_offset_reset => "latest"
    consumer_threads => 10
    decorate_events => false
    topics => ["www.zhukun.net"]
  }
}

filter {
    mutate {
        gsub =>["message",'\\"','"']
        gsub =>["message",'\\"','\\\\"']
    }
    json {
        source => "message"
        target => "aduser"
    }

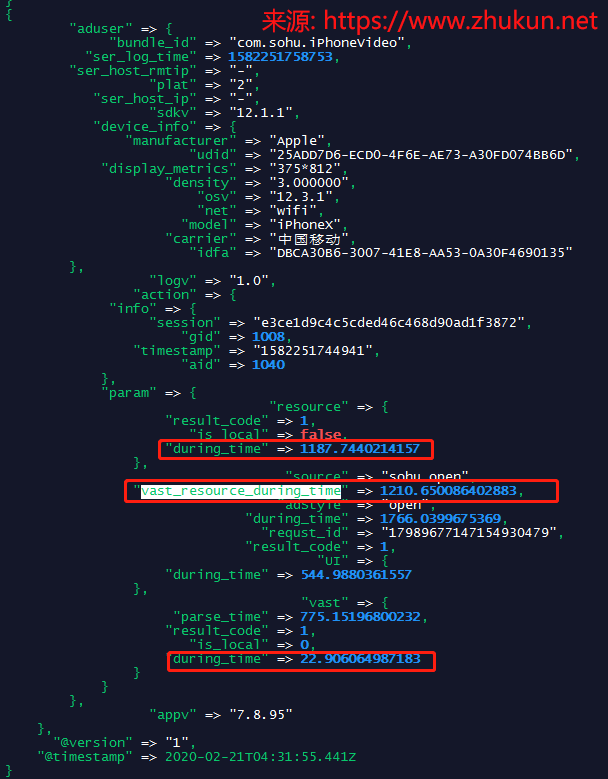
    # 将[aduser][action][info][timestamp]映射为@timestamp
    # 需要注意的是, 即使是UNIX时间戳, 也有带毫秒和不带毫秒的, 可能是UNIX或者UNIX_MS
    date {
        match => [ "[aduser][action][info][timestamp]", "UNIX_MS" ]
        target => "@timestamp"
        locale => "cn"
    }

    # 如果这2个Field都存在, 则对它们进行相加, 形成一个新的Field
    if [aduser][action][param][vast][during_time] and [aduser][action][param][resource][during_time] {
        ruby {
            code => 'event.set("[aduser][action][param][vast_resource_during_time]", event.get("[aduser][action][param][vast][during_time]") + event.get("[aduser][action][param][resource][during_time]") )'
        }
    } else {
        drop  { }
    }
    mutate {
        remove_field => [ "message" ]
    }
}

output {
    stdout {
       codec => rubydebug {
    #       metadata => true
        }
    }
}

最后解析出来的样子是这样的
Logstash对Field进行简单数学计算

参考文档:
官方介绍地址
Simple Math Functions with Ruby in Logstash 5.3
Logstash中的数学函数

Leave a Comment

redis安装好之后必做的几件事

先来看一段日志

1525:M 21 Nov 11:10:36.412 # WARNING: The TCP backlog setting of 511 cannot be enforced because /proc/sys/net/core/somaxconn is set to the lower value of 128.
22552:M 19 Jan 10:36:26.936 # Server started, Redis version 3.2.12
22552:M 19 Jan 10:36:26.936 # WARNING overcommit_memory is set to 0! Background save may fail under low memory condition. To fix this issue add 'vm.overcommit_memory = 1' to /etc/sysctl.conf and then reboot or run the command 'sysctl vm.overcommit_memory=1' for this to take effect.
22552:M 19 Jan 10:36:26.936 # WARNING you have Transparent Huge Pages (THP) support enabled in your kernel. This will create latency and memory usage issues with Redis. To fix this issue run the command 'echo never > /sys/kernel/mm/transparent_hugepage/enabled' as root, and add it to your /etc/rc.local in order to retain the setting after a reboot. Redis must be restarted after THP is disabled.
22552:M 19 Jan 10:36:26.936 * The server is now ready to accept connections on port 6380

解决办法:

$ echo never > /sys/kernel/mm/transparent_hugepage/enabled

$ vim /etc/rc.local  # 写入下面一行
echo never > /sys/kernel/mm/transparent_hugepage/enabled

$ vim /etc/sysctl.conf  # 写入下面2行
net.core.somaxconn = 1024
vm.overcommit_memory = 1

$ sysctl -p
Leave a Comment

Redis监控(Grafana+Prometheus+redis_exporter)

先看一下最终的效果图(本文中的图片均可以点击查看大图)
Redis监控(Grafana+Prometheus+redis_exporter)

环境准备

Promethus推荐的Exporter: https://prometheus.io/docs/instrumenting/exporters/

其推荐的是这个redis_exporter: https://github.com/oliver006/redis_exporter, 本文略过了Grafana+Prometheus+redis_exporter的安装过程, 我们假设redis_exporter的安装位置为/data/apps/redis_exporter/redis_exporter

查看每个机器上Redis的连接密码

$ grep requirepass /data/conf/redis/redis-670*.conf | grep -v '\#'

要监控的机器redis节点

此组redis密码:K8aBe56E         此组redis密码:uizJFaP9
10.16.19.37:6700              10.16.19.37:6703
10.16.19.37:6701              10.16.19.37:6704
10.16.19.37:6702              10.16.19.37:6705 
10.16.19.40:6700              10.16.19.40:6703
10.16.19.40:6701              10.16.19.40:6704
10.16.19.40:6702              10.16.19.40:6705
10.16.19.58:6700              10.16.19.58:6703
10.16.19.58:6701              10.16.19.58:6704
10.16.19.58:6702              10.16.19.58:6705
2 Comments

Ubuntu/Fedora/Debian系统安装Zukitwo Theme

准备环境

Debian/Ubuntu/Mint系统
apt install gtk2-engines-murrine gtk2-engines-pixbuf fonts-roboto ninja-build git sassc

Fedora系统
dnf install gtk-murrine-engine gtk2-engines google-roboto-fonts ninja-build git sassc

安装meson

sudo apt install python3-pip
sudo pip3 install meson

正式安装

git clone https://github.com/lassekongo83/zuki-themes.git
cd zuki-themes
/usr/local/bin/meson build
sudo ninja -C build install

部分文档来自原作者github.

1 Comment