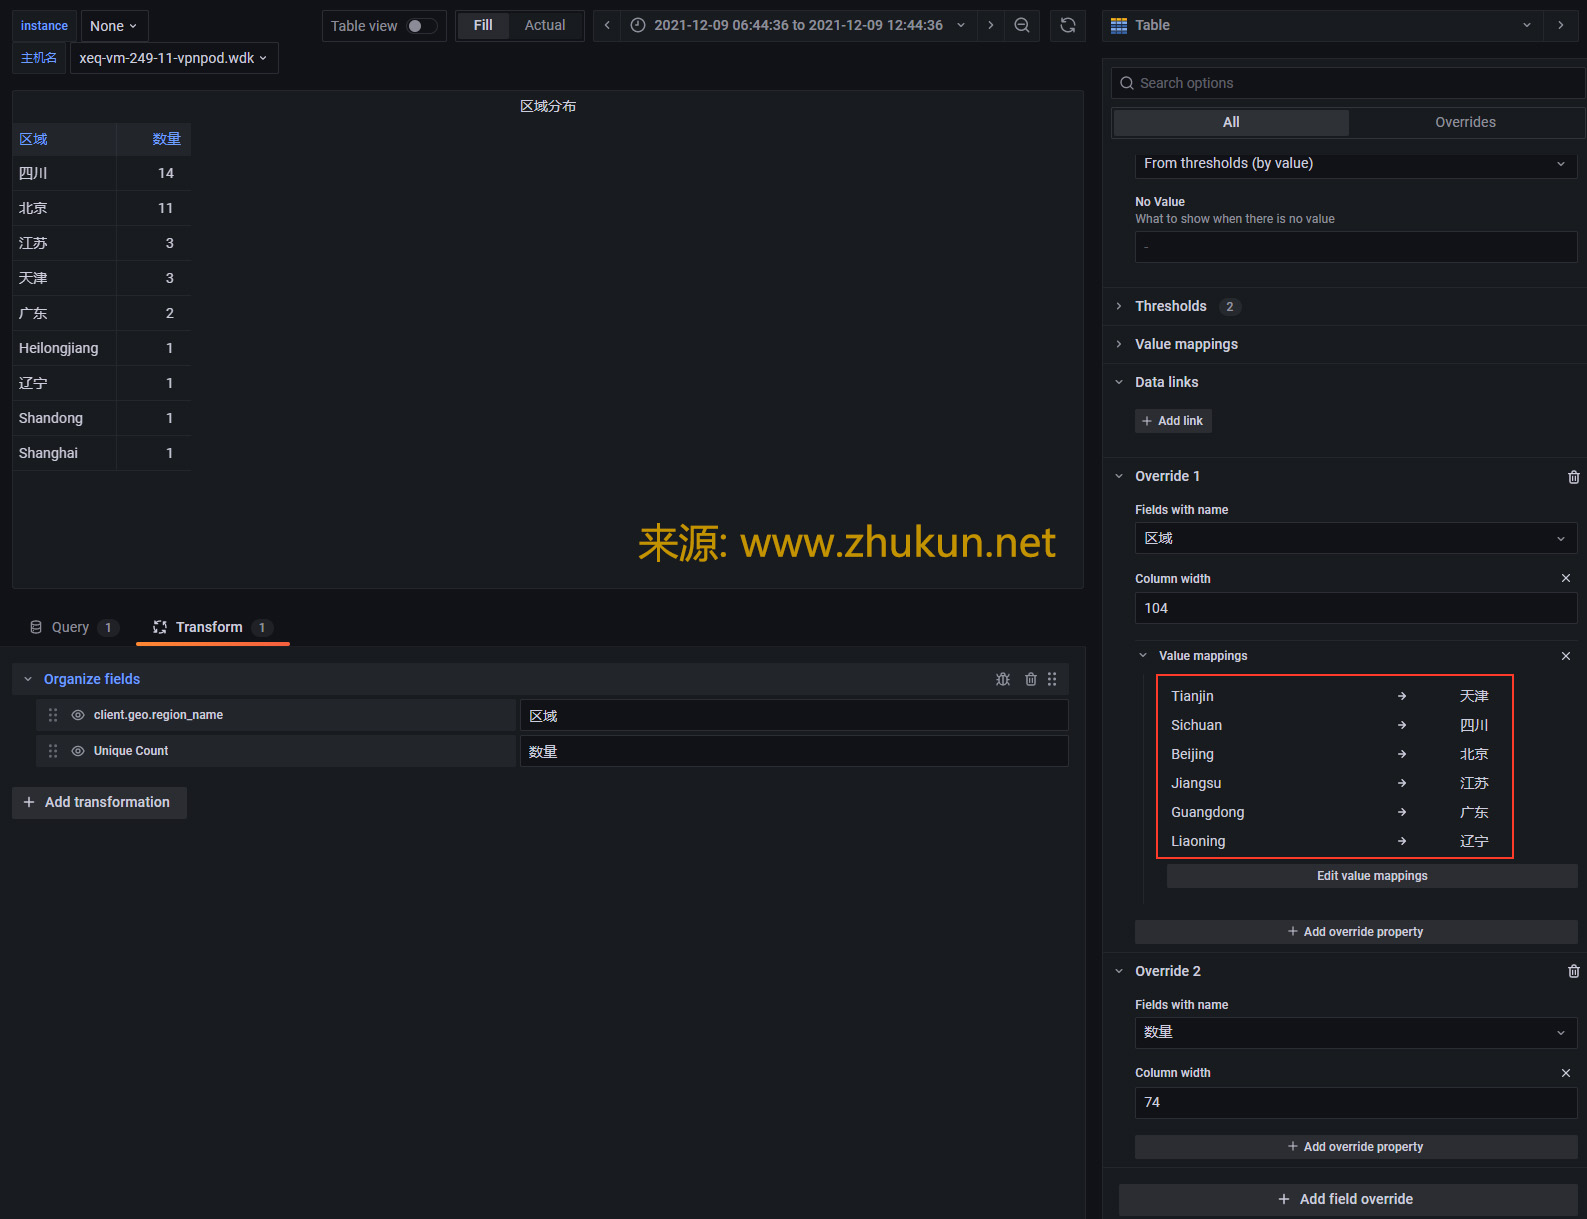
Create Worldmap/Table panel in grafana with Elasticsearch datasource
某天接到一个需求, 即在Grafana中添加一个Table panel, 将AD系统里面登陆失败的用户都挑出来, 展示在table里面, 同时也将失败次数展示出来.
接下来看看Worldmap panel. 新版Grafana的很多设定都发生了变化.
不见去年人, 泪湿春衫袖。
某天接到一个需求, 即在Grafana中添加一个Table panel, 将AD系统里面登陆失败的用户都挑出来, 展示在table里面, 同时也将失败次数展示出来.
接下来看看Worldmap panel. 新版Grafana的很多设定都发生了变化.
1, stop shard allocation for this node
$ curl -XGET "127.0.0.1:9200/_cat/allocation?v"
shards disk.indices disk.used disk.avail disk.total disk.percent host         ip           node
   412      960.3gb     1.8tb     15.6tb     17.4tb           10 172.29.4.156 172.29.4.156 es_node_156_2
   411      478.9gb     1.5tb     15.9tb     17.4tb            8 172.29.4.158 172.29.4.158 es_node_158_2
   411      557.5gb   558.7gb     16.9tb     17.4tb            3 172.29.4.157 172.29.4.157 es_node_157
   411      743.5gb     1.5tb     15.9tb     17.4tb            8 172.29.4.158 172.29.4.158 es_node_158
   411          1tb       1tb      9.9tb     10.9tb            9 172.29.4.177 172.29.4.177 es_node_177
   411      840.6gb     1.8tb     15.6tb     17.4tb           10 172.29.4.156 172.29.4.156 es_node_156
   248        9.3tb     9.3tb      1.5tb     10.9tb           85 172.29.4.178 172.29.4.178 es_node_178
假设我们希望下掉es_node_158_2这个节点, 则下面3条命令任选其一
curl -XPUT 127.0.0.1:9200/_cluster/settings -H 'Content-Type: application/json' -d '{
  "transient" :{
    "cluster.routing.allocation.exclude._ip": "<node_ip_address>"
  }
}'


curl -XPUT 127.0.0.1:9200/_cluster/settings -H 'Content-Type: application/json' -d '{
  "transient" :{
    "cluster.routing.allocation.exclude._name": "es_node_158_2"
  }
}'


curl -XPUT 127.0.0.1:9200/_cluster/settings -H 'Content-Type: application/json' -d '{
  "transient" :{
    "cluster.routing.allocation.exclude._id": "<node_id>"
  }
}'
确认上面的命令执行成功
curl -XGET "127.0.0.1:9200/_cluster/settings?pretty=true"
{
  "persistent" : {
    "cluster" : {
      "max_shards_per_node" : "30000"
    },
    "indices" : {
      "breaker" : {
        "fielddata" : {
          "limit" : "20%"
        }
      }
    },
    "search" : {
      "max_buckets" : "87000"
    },
    "xpack" : {
      "monitoring" : {
        "collection" : {
          "enabled" : "true"
        }
      }
    }
  },
  "transient" : {
    "cluster" : {
      "routing" : {
        "allocation" : {
          "enable" : "all",
          "exclude" : {
            "_name" : "es_node_158_2"
          }
        }
      }
    }
  }
}
然后Elasticsearch会将es_node_158_2节点上的shards分配给其余节点. 再次查看shards allocation情况会发现es_node_158_2上面的shards数量在明显减少.
$ curl -XGET "127.0.0.1:9200/_cat/allocation?v"
shards disk.indices disk.used disk.avail disk.total disk.percent host         ip           node
   248        9.3tb     9.3tb      1.5tb     10.9tb           85 172.29.4.178 172.29.4.178 es_node_178
   438          1tb       1tb      9.9tb     10.9tb            9 172.29.4.177 172.29.4.177 es_node_177
   417      559.9gb   561.1gb     16.9tb     17.4tb            3 172.29.4.157 172.29.4.157 es_node_157
   441      963.1gb     1.8tb     15.6tb     17.4tb           10 172.29.4.156 172.29.4.156 es_node_156_2
   443      842.5gb     1.8tb     15.6tb     17.4tb           10 172.29.4.156 172.29.4.156 es_node_156
   443      747.1gb     1.5tb     15.9tb     17.4tb            8 172.29.4.158 172.29.4.158 es_node_158
   285      472.7gb     1.5tb     15.9tb     17.4tb            8 172.29.4.158 172.29.4.158 es_node_158_2  # shards开始减少
2, stop node and afterwork
等es_node_158_2上面的shards数量变为0的时候, 就可以登陆es_node_158_2并shutdown elasticsearch service了.
在es_node_158_2上面执行
$ systemctl stop elasticsearch
$ systemctl disable elasticsearch
在其它node上面执行
$ curl -XPUT 127.0.0.1:9200/_cluster/settings -H 'Content-Type: application/json' -d '{
  "transient" :{
    "cluster.routing.allocation.exclude._name": null
  }
}'
Read More
迁移ElasticSearch集群的数据, 最好用的是用到ElasticSearch的CCR(Cross-cluster replication, 跨集群复制)功能(官方文档在此). 但无奈今天配置了一天, 怎么也没有成功. 其实CCR存在的意义不仅仅是迁移数据, 更重要的是保证ElasticSearch集群的多副本/高可用状态. 比如, 如果你的主ES集群不能对外暴露, 那么可以设置一个readonly的对外暴露集群(数据通过CCR功能与主集群保持同步, 等. 而如果仅仅是迁移数据的话, 只用到ES的reindex功能即可完成.
将旧集群(172.29.4.168:9200)里的mail-w3svc1-2020.06.06索引数据迁移过来, 仅需要在新集群上执行如下命令即可.
curl -X POST "localhost:9200/_reindex?pretty" -H 'Content-Type: application/json' -d'
{
  "source": {
    "remote": {
      "host": "http://172.29.4.168:9200",
      "username": "elastic",
      "password": "MyPassword"
    },
    "index": "mail-w3svc1-2020.06.06"
  },
  "dest": {
    "index": "mail-2020.06.06"
  }
}'
参考文档:
Reindex API
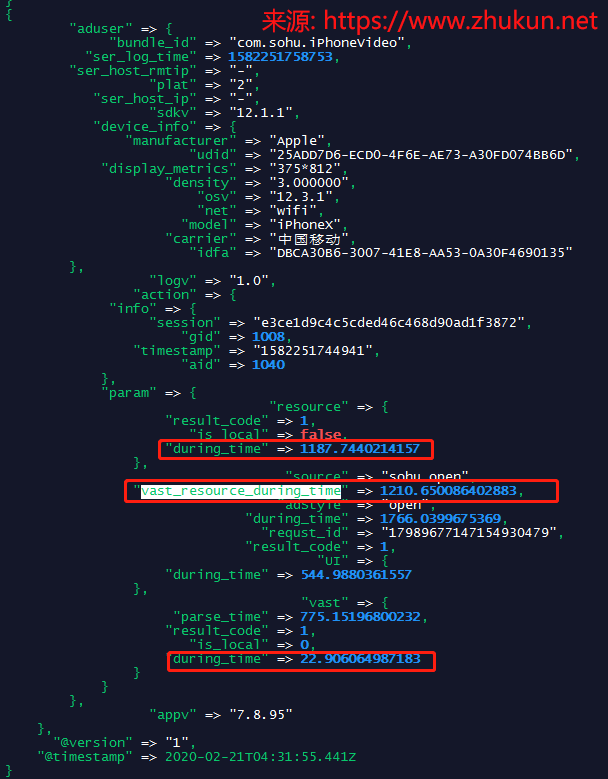
Logstash解析出Field以后, 可以使用filter的ruby插件进行简单数学计算/大小写转换等操作(官方介绍地址), 下面是配置
input {
  kafka{
    bootstrap_servers => ["www.hizy.net:6667,www.xpdo.net:6667","www.zhukun.net:6667"]
    client_id => "logstash_www.xpdo.net"
    group_id => "www.zhukun.net"
    auto_offset_reset => "latest"
    consumer_threads => 10
    decorate_events => false
    topics => ["www.zhukun.net"]
  }
}

filter {
    mutate {
        gsub =>["message",'\\"','"']
        gsub =>["message",'\\"','\\\\"']
    }
    json {
        source => "message"
        target => "aduser"
    }

    # 将[aduser][action][info][timestamp]映射为@timestamp
    # 需要注意的是, 即使是UNIX时间戳, 也有带毫秒和不带毫秒的, 可能是UNIX或者UNIX_MS
    date {
        match => [ "[aduser][action][info][timestamp]", "UNIX_MS" ]
        target => "@timestamp"
        locale => "cn"
    }

    # 如果这2个Field都存在, 则对它们进行相加, 形成一个新的Field
    if [aduser][action][param][vast][during_time] and [aduser][action][param][resource][during_time] {
        ruby {
            code => 'event.set("[aduser][action][param][vast_resource_during_time]", event.get("[aduser][action][param][vast][during_time]") + event.get("[aduser][action][param][resource][during_time]") )'
        }
    } else {
        drop  { }
    }
    mutate {
        remove_field => [ "message" ]
    }
}

output {
    stdout {
       codec => rubydebug {
    #       metadata => true
        }
    }
}
最后解析出来的样子是这样的
参考文档:
官方介绍地址
Simple Math Functions with Ruby in Logstash 5.3
Logstash中的数学函数
kibana使用的是lucene查询语法, 使用该语法不仅可以在kibana上使用, 也可以在Grafana中使用.
下面简单介绍一下使用方法.
在搜索栏输入login, 会返回所有字段值中包含login的文档
使用双引号包起来作为一个短语搜索
"like Gecko"也可以按页面左侧显示的字段搜索
field:value      # 限定字段全文搜索
filed:"value"    # 精确搜索, 关键字加上双引号
http_code:404    # 搜索http状态码为404的文档
字段本身是否存在
_exists_:http_host    # 返回结果中需要有http_host字段
_missing_:http_host   # 不能含有http_host字段