Press "Enter" to skip to content

Tag: Linux

内网穿透: 使用ssh tunnel将内网主机映射到公网

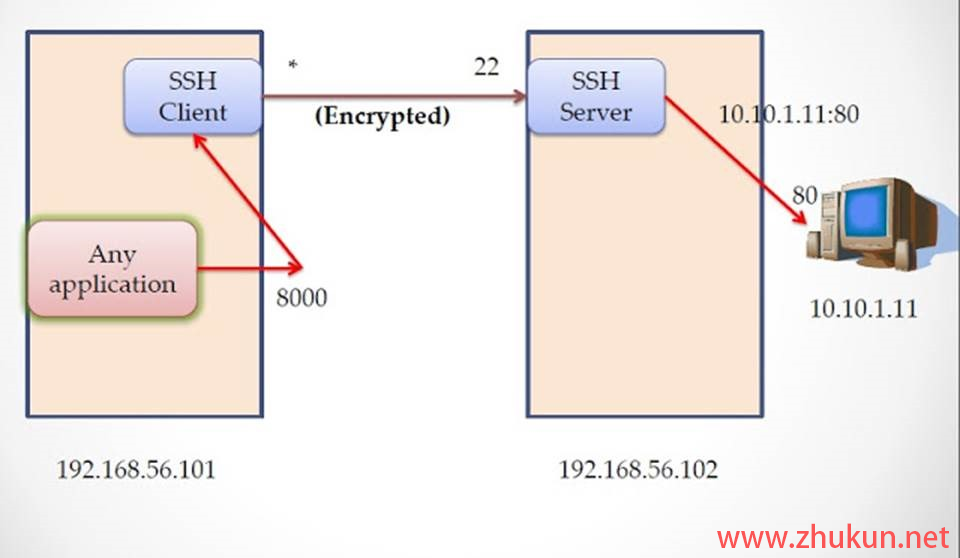
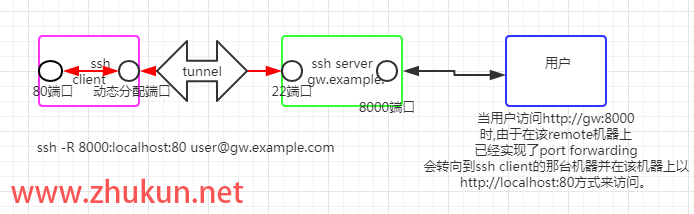
如果希望将一台内网中的主机发布到公网(使用阿里云/腾讯云中转的方式), 使得该内网主机可以在全球任意地点被访问, 仅需要用到ssh即可. 用到的原理就是ssh的remote port forwarding特性, 具体可参考本博客之前写的简单解释 ssh 中的 local port forwarding 和 remote port forwarding.

假设我们已经有了一台阿里云/腾讯云的主机, 其公网IP是1.1.1.1, 需要在ssh配置里启用GatewayPorts(否则ssh tunnel建立以后只会监听127.0.0.1)

在我们的内网主机上写入一个systemd服务

sudo vim /etc/systemd/system/[email protected]    # 写入如下内容
[Unit]
Description=Persistent SSH Tunnel to from port 127.0.0.1:%i on this server to port 3389 on external server(1.1.1.1:3389)
After=network.target
 
[Service]
Environment="LOCAL_PORT=%i"
ExecStart=/usr/bin/ssh -NTC -o ServerAliveInterval=60 -o ExitOnForwardFailure=yes -R 3389:0.0.0.0:${LOCAL_PORT} [email protected]
Restart=on-failure
RestartSec=5

[Install]
WantedBy=multi-user.target

参数解释:
T: 禁止分配伪终端
N: 不执行远程指令
C: 请求压缩所有数据

然后启用服务

sudo systemctl daemon-reload
sudo systemctl enable ssh-tunnel@22 --now

然后就可以通过1.1.1.1:3389来访问这台内网主机的22端口了.

参考文档: README-setup-tunnel-as-systemd-service.md

2 Comments

OpenVZ vps 使用 snapd 部署 certbot

在 OpenVZ 的 vps 上使用 snapd 时, 会出现如下提示

error: system does not fully support snapd: cannot mount squashfs image using "squashfs": mount:
       /tmp/sanity-mountpoint-404380626: mount failed: Operation not permitted.
error: system does not fully support snapd: cannot mount squashfs image using "squashfs": mount:
       /tmp/sanity-mountpoint-404380626: mount failed: Operation not permitted.

下面介绍解决办法:

sudo apt install fuse squashfuse snapd
sudo mknod -m 666 /dev/fuse c 10 229
sudo snap install core; sudo snap refresh core
sudo apt-get remove certbot
sudo snap install --classic certbot
sudo ln -s /snap/bin/certbot /usr/bin/certbot

参考文档.

Leave a Comment

Create Worldmap/Table panel in grafana with Elasticsearch datasource

某天接到一个需求, 即在Grafana中添加一个Table panel, 将AD系统里面登陆失败的用户都挑出来, 展示在table里面, 同时也将失败次数展示出来.

Create Table panel in grafana with Elasticsearch datasource

接下来看看Worldmap panel. 新版Grafana的很多设定都发生了变化.

Create Worldmap panel in grafana with Elasticsearch datasource
Leave a Comment

简单解释 ssh 中的 local port forwarding 和 remote port forwarding

1, local port forwarding

ssh client端:
ssh server端: serverIP:80

如果希望在ssh client端访问ssh server端的80端口, 则可以运行

ssh -L 8000:serverIP:80 user@serverIP

然后就可以在client端通过访问127.0.0.1:8000达到访问server端80端口的目的

提示:
8000:serverIP:80这里的serverIP不一定要是server自己, 也可以是127.0.0.1, 或者是任何server端能够访问的远程地址.
然后就可以实现在ssh client端访问serverIP:80(即在client端访问127.0.0.1:8000)

下面是一个例子

如上图. 如果执行了

ssh -L 8000:10.10.1.11:80 [email protected]

那么, 访问192.168.56.101:8000则等同于访问了10.10.1.1:80

2, remote port forwarding

ssh client端: clientIP:80
ssh server端:

如果希望在server端访问client端的80端口

ssh -R 8000:localhost:80 user@serverip

然后就可以在ssh server端通过访问127.0.0.1:8000达到访问client端80端口的目的.

提示:
命令里的localhost指的是client侧的IP, 命令里的localhost不一定得是ssh client本身, 也可以是任何一个ssh client可达的地址.
server端默认是会监听127.0.0.1:8000, 如果想让server端监听0.0.0.0:8000, 需要将ssh配置中的GatewayPorts配置项打开

下面是一个例子

Leave a Comment

转载: Ubuntu20.04简单修改IP

在网上搜到的ubuntu改IP都是通过手写interfaces文件,这需要记住语法和格式,很不方便,在Redhat系上,可以使用很方便的NetworkManager的nmtui的Text UI来设置IP,我们只需要填写我们希望的网络信息即可,那么在ubuntu上其实也是有简便的方法;

ubuntu 20使用的netplan来管理,其配置文件使用的YAML,虽然语法格式也简单,但是还是可以有不用记的方式来完成IP的修改;

默认情况下的配置文件在/etc/netplan/00-installer-config.yaml,默认使用DHCP的方式,全部内容为

# This is the network config written by 'subiquity'
network:
  ethernets:
    eth0:
      dhcp4: true
  version: 2

Linux上,大部分软件都包含了自己的文档,常规的包含README,Example之类的,目录在/usr/share/doc/netplan下,有个examples目录,当中包含了很多网络的配置文件模板,如

$ ls /usr/share/doc/netplan/examples/
bonding_router.yaml   direct_connect_gateway_ipv6.yaml  route_metric.yaml                           windows_dhcp_server.yaml
bonding.yaml          direct_connect_gateway.yaml       source_routing.yaml                         wireless.yaml
bridge_vlan.yaml      ipv6_tunnel.yaml                  static_multiaddress.yaml                    wpa_enterprise.yaml
bridge.yaml           loopback_interface.yaml           static_singlenic_multiip_multigateway.yaml
dhcp_wired8021x.yaml  modem.yaml                        static.yaml
dhcp.yaml             network_manager.yaml              vlan.yaml

找到static.yaml就是我们想要的静态IP配置文件模板,现成的格式和内容;拷贝到/etc/netplan下即可;

# 先备份源文件
sudo cp /etc/netplan/00-installer-config.yaml /etc/netplan/00-installer-config.yaml.bak
# 拷贝静态IP配置文件
sudo cp /usr/share/doc/netplan/examples/static.yaml /etc/netplan/

# 简单修改一下;它的默认是这样的
network:
  version: 2
  renderer: networkd
  ethernets:
    enp3s0:
      addresses:
        - 10.10.10.2/24
      nameservers:
        search: [mydomain, otherdomain]
        addresses: [10.10.10.1, 1.1.1.1]
      routes: 
        - to: default
          via: 10.10.10.1

修改完成后,应用即可

sudo netplan apply

本文转载自八宝叠云峰.

Leave a Comment

CentOS 7解决arp欺骗

某天发现一台CentOS机器网络一切正常, 但是却无法正常上网. 后经查询, 发现该机器的网关mac地址与实际网关的mac地址不符.  下面是查看和解决办法.

查看arp

$ cat /proc/net/arp 
IP address       HW type     Flags       HW address            Mask     Device
192.168.43.62    0x1         0x2         24:6e:96:93:c9:7d     *        eth0
192.168.43.61    0x1         0x2         24:6e:96:8c:e0:65     *        eth0
192.168.43.154   0x1         0x0         00:00:00:00:00:00     *        eth0
192.168.43.153   0x1         0x2         52:54:00:fa:bb:fc     *        eth0
192.168.43.60    0x1         0x0         00:00:00:00:00:00     *        eth0
192.168.43.59    0x1         0x0         00:00:00:00:00:00     *        eth0
192.168.43.151   0x1         0x2         52:54:00:aa:73:e2     *        eth0
192.168.43.11    0x1         0x0         00:00:00:00:00:00     *        eth0
192.168.43.31    0x1         0x2         00:be:75:c7:47:ea     *        eth0
192.168.43.111   0x1         0x0         00:00:00:00:00:00     *        eth0
192.168.43.27    0x1         0x2         52:54:00:b4:3f:a3     *        eth0
192.168.43.224   0x1         0x0         00:00:00:00:00:00     *        eth0
192.168.43.26    0x1         0x2         52:54:00:33:50:7e     *        eth0
192.168.43.223   0x1         0x0         00:00:00:00:00:00     *        eth0
192.168.43.25    0x1         0x2         52:54:00:b4:3f:a3     *        eth0
192.168.43.1     0x1         0x2         3c:f5:cc:91:79:87     *        eth0
192.168.43.163   0x1         0x2         52:54:00:78:13:7d     *        eth0
192.168.43.162   0x1         0x2         52:54:00:7f:83:a4     *        eth0
192.168.43.104   0x1         0x2         52:54:00:34:0c:fc     *        eth0
192.168.43.21    0x1         0x0         00:00:00:00:00:00     *        eth0
192.168.43.44    0x1         0x2         24:6e:96:93:a3:c4     *        eth0
192.168.43.43    0x1         0x2         24:6e:96:8c:df:64     *        eth0
192.168.43.158   0x1         0x2         52:54:00:9a:ff:9f     *        eth0
192.168.43.122   0x1         0x2         52:54:00:99:e5:5e     *        eth0


$ arp -a
? (192.168.43.62) at 24:6e:96:93:c9:7d [ether] on eth0
? (192.168.43.61) at 24:6e:96:8c:e0:65 [ether] on eth0
? (192.168.43.154) at <incomplete> on eth0
? (192.168.43.153) at 52:54:00:fa:bb:fc [ether] on eth0
? (192.168.43.60) at <incomplete> on eth0
? (192.168.43.59) at <incomplete> on eth0
? (192.168.43.151) at 52:54:00:aa:73:e2 [ether] on eth0
? (192.168.43.11) at <incomplete> on eth0
? (192.168.43.31) at 00:be:75:c7:47:ea [ether] on eth0
? (192.168.43.111) at <incomplete> on eth0
? (192.168.43.27) at 52:54:00:b4:3f:a3 [ether] on eth0
? (192.168.43.224) at <incomplete> on eth0
? (192.168.43.26) at 52:54:00:33:50:7e [ether] on eth0
? (192.168.43.223) at <incomplete> on eth0
? (192.168.43.25) at 52:54:00:b4:3f:a3 [ether] on eth0
gateway (192.168.43.1) at 3c:f5:cc:91:79:87 [ether] on eth0
? (192.168.43.163) at 52:54:00:78:13:7d [ether] on eth0
? (192.168.43.162) at 52:54:00:7f:83:a4 [ether] on eth0
? (192.168.43.104) at 52:54:00:34:0c:fc [ether] on eth0
? (192.168.43.21) at <incomplete> on eth0
? (192.168.43.44) at 24:6e:96:93:a3:c4 [ether] on eth0
? (192.168.43.43) at 24:6e:96:8c:df:64 [ether] on eth0
? (192.168.43.158) at 52:54:00:9a:ff:9f [ether] on eth0

绑定arp

绑定arp的过程在某些国外网站称之为Create a Static ARP Table. 下面演示手动绑定网关192.168.43.1的mac地址为74:ea:c8:2d:9f:f6

arp -s 192.168.43.1 74:ea:c8:2d:9f:f6


Leave a Comment

使用python判断IP段可用IP及数量

使用python判断IP段可用IP及数量, 很简单.几个命令就可以(本文基于python3).

>>> import ipaddress
>>> bool(ipaddress.ip_address('172.21.97.12') in ipaddress.ip_network('172.16.0.0/12'))
True
>>>
>>> for ip in ipaddress.ip_network('192.168.0.0/28'):
...     print(ip)
...
192.168.0.0
192.168.0.1
192.168.0.2
192.168.0.3
192.168.0.4
192.168.0.5
192.168.0.6
192.168.0.7
192.168.0.8
192.168.0.9
192.168.0.10
192.168.0.11
192.168.0.12
192.168.0.13
192.168.0.14
192.168.0.15
>>>
>>> ipaddress.ip_network('192.168.0.0/28').num_addresses
16

批量计算

$ cat 2
172.16.128.0/18
172.16.32.0/20
172.16.64.0/19
172.19.192.0/19
172.16.240.0/21
172.16.48.0/20
172.16.192.0/19
172.19.160.0/19
172.19.64.0/18
172.16.24.0/21
172.16.96.0/19
172.19.128.0/19


$ python3
>>> import ipaddress
>>> with open("./2", "r") as f:
...     for i in f.readlines():
...         print(ipaddress.ip_network(i.rstrip()).num_addresses)
...
16384
4096
8192
8192
2048
4096
8192
8192
16384
2048
8192
8192


3 Comments