Press "Enter" to skip to content

月与灯依旧 Posts

解决youtube-dl下载时遇到的ERROR: Stream #1:0 -> #0:1 (copy)问题

今天使用youtube-dl下载视频时, 遇到了ERROR: Stream #1:0 -> #0:1 (copy)的错误. 上网查了一下原因, 是youtube-dl和ffmpeg不兼容所致. 于是把youtube-dl和ffmpeg都升级到最新版, 发现问题依旧. 经过一番Google, 也算是找到了解决办法:

之前一直使用的下载方式

sudo yt-dlp --merge-output-format mp4 -f bestvideo+bestaudio https://www.youtube.com/watch?v=L2I67vUK4fY

如果遇到了ERROR: Stream #1:0 -> #0:1 (copy)的错误, 可以使用下面的办法

# 先把视频和音频都下载回来
sudo yt-dlp -f bestvideo[ext=webm]+bestaudio[ext=m4a] https://www.youtube.com/watch?v=L2I67vUK4fY
# 然后再手动merge
sudo ffmpeg -i 1.webm -i 1.m4a -c copy 1.mkv

Leave a Comment

MPC-HC部署MPC VideoRender滤镜

1, 准备工作

MPC-HC的下载地址
MPC VideoRender的下载地址

2, 安装MPC VideoRender滤镜

将下载回来的MPC VideoRender滤镜解压至 C:\Program Files\mpcVR 目录下
右键”以管理员身份运行” Install_MPCVR_64.cmd
则会看到下方提示

Installation succeeded.
Please do not delete the MpcVideoRenderer64.ax file.
The installer has not copied the files anywhere.

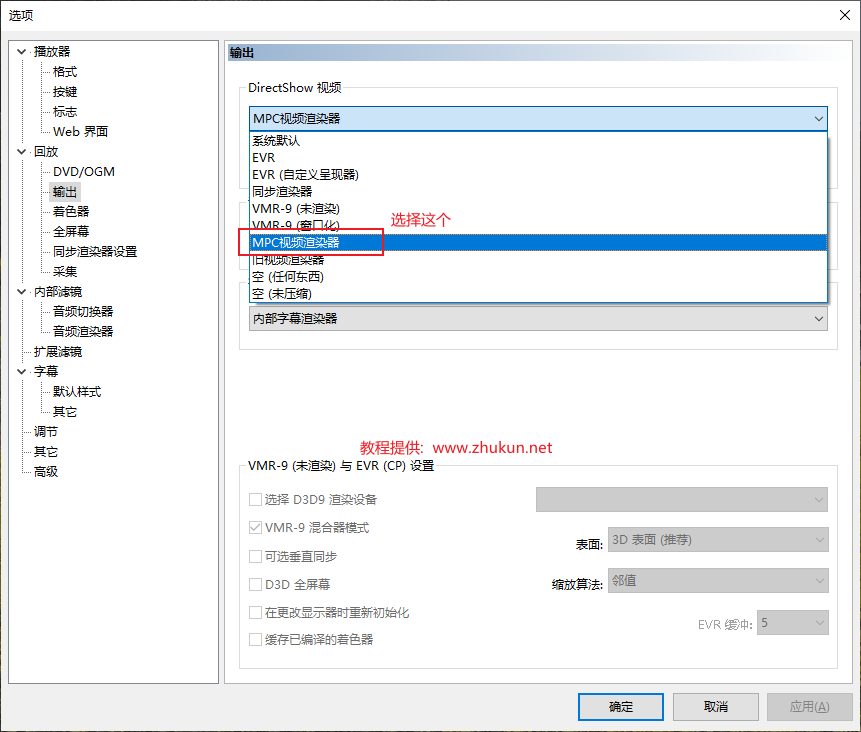
3, 在MPC-HC中启用MPC VideoRender滤镜

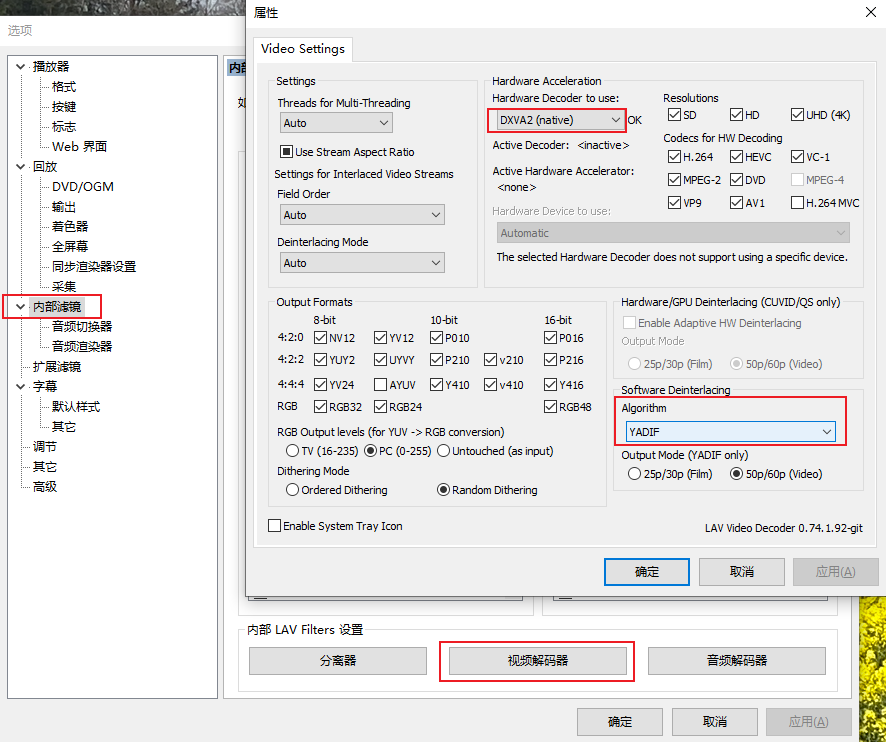
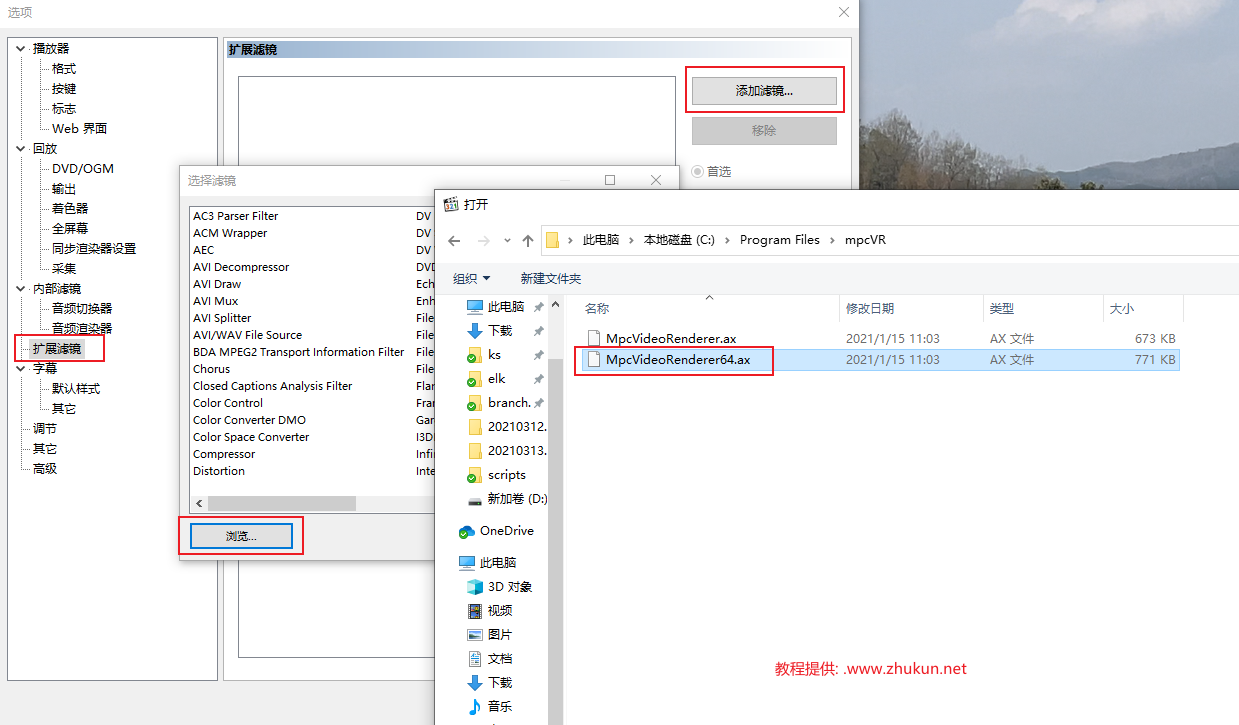
打开MPC-HC, 找到”选项”, 进行如下设定

参考文档:
https://ngabbs.com/read.php?tid=25033883&rand=660

1 Comment

CentOS 7解决arp欺骗

某天发现一台CentOS机器网络一切正常, 但是却无法正常上网. 后经查询, 发现该机器的网关mac地址与实际网关的mac地址不符.  下面是查看和解决办法.

查看arp

$ cat /proc/net/arp 
IP address       HW type     Flags       HW address            Mask     Device
192.168.43.62    0x1         0x2         24:6e:96:93:c9:7d     *        eth0
192.168.43.61    0x1         0x2         24:6e:96:8c:e0:65     *        eth0
192.168.43.154   0x1         0x0         00:00:00:00:00:00     *        eth0
192.168.43.153   0x1         0x2         52:54:00:fa:bb:fc     *        eth0
192.168.43.60    0x1         0x0         00:00:00:00:00:00     *        eth0
192.168.43.59    0x1         0x0         00:00:00:00:00:00     *        eth0
192.168.43.151   0x1         0x2         52:54:00:aa:73:e2     *        eth0
192.168.43.11    0x1         0x0         00:00:00:00:00:00     *        eth0
192.168.43.31    0x1         0x2         00:be:75:c7:47:ea     *        eth0
192.168.43.111   0x1         0x0         00:00:00:00:00:00     *        eth0
192.168.43.27    0x1         0x2         52:54:00:b4:3f:a3     *        eth0
192.168.43.224   0x1         0x0         00:00:00:00:00:00     *        eth0
192.168.43.26    0x1         0x2         52:54:00:33:50:7e     *        eth0
192.168.43.223   0x1         0x0         00:00:00:00:00:00     *        eth0
192.168.43.25    0x1         0x2         52:54:00:b4:3f:a3     *        eth0
192.168.43.1     0x1         0x2         3c:f5:cc:91:79:87     *        eth0
192.168.43.163   0x1         0x2         52:54:00:78:13:7d     *        eth0
192.168.43.162   0x1         0x2         52:54:00:7f:83:a4     *        eth0
192.168.43.104   0x1         0x2         52:54:00:34:0c:fc     *        eth0
192.168.43.21    0x1         0x0         00:00:00:00:00:00     *        eth0
192.168.43.44    0x1         0x2         24:6e:96:93:a3:c4     *        eth0
192.168.43.43    0x1         0x2         24:6e:96:8c:df:64     *        eth0
192.168.43.158   0x1         0x2         52:54:00:9a:ff:9f     *        eth0
192.168.43.122   0x1         0x2         52:54:00:99:e5:5e     *        eth0


$ arp -a
? (192.168.43.62) at 24:6e:96:93:c9:7d [ether] on eth0
? (192.168.43.61) at 24:6e:96:8c:e0:65 [ether] on eth0
? (192.168.43.154) at <incomplete> on eth0
? (192.168.43.153) at 52:54:00:fa:bb:fc [ether] on eth0
? (192.168.43.60) at <incomplete> on eth0
? (192.168.43.59) at <incomplete> on eth0
? (192.168.43.151) at 52:54:00:aa:73:e2 [ether] on eth0
? (192.168.43.11) at <incomplete> on eth0
? (192.168.43.31) at 00:be:75:c7:47:ea [ether] on eth0
? (192.168.43.111) at <incomplete> on eth0
? (192.168.43.27) at 52:54:00:b4:3f:a3 [ether] on eth0
? (192.168.43.224) at <incomplete> on eth0
? (192.168.43.26) at 52:54:00:33:50:7e [ether] on eth0
? (192.168.43.223) at <incomplete> on eth0
? (192.168.43.25) at 52:54:00:b4:3f:a3 [ether] on eth0
gateway (192.168.43.1) at 3c:f5:cc:91:79:87 [ether] on eth0
? (192.168.43.163) at 52:54:00:78:13:7d [ether] on eth0
? (192.168.43.162) at 52:54:00:7f:83:a4 [ether] on eth0
? (192.168.43.104) at 52:54:00:34:0c:fc [ether] on eth0
? (192.168.43.21) at <incomplete> on eth0
? (192.168.43.44) at 24:6e:96:93:a3:c4 [ether] on eth0
? (192.168.43.43) at 24:6e:96:8c:df:64 [ether] on eth0
? (192.168.43.158) at 52:54:00:9a:ff:9f [ether] on eth0

绑定arp

绑定arp的过程在某些国外网站称之为Create a Static ARP Table. 下面演示手动绑定网关192.168.43.1的mac地址为74:ea:c8:2d:9f:f6

arp -s 192.168.43.1 74:ea:c8:2d:9f:f6


Leave a Comment

remove a node from ElasticSearch cluster

1, stop shard allocation for this node

$ curl -XGET "127.0.0.1:9200/_cat/allocation?v"
shards disk.indices disk.used disk.avail disk.total disk.percent host         ip           node
   412      960.3gb     1.8tb     15.6tb     17.4tb           10 172.29.4.156 172.29.4.156 es_node_156_2
   411      478.9gb     1.5tb     15.9tb     17.4tb            8 172.29.4.158 172.29.4.158 es_node_158_2
   411      557.5gb   558.7gb     16.9tb     17.4tb            3 172.29.4.157 172.29.4.157 es_node_157
   411      743.5gb     1.5tb     15.9tb     17.4tb            8 172.29.4.158 172.29.4.158 es_node_158
   411          1tb       1tb      9.9tb     10.9tb            9 172.29.4.177 172.29.4.177 es_node_177
   411      840.6gb     1.8tb     15.6tb     17.4tb           10 172.29.4.156 172.29.4.156 es_node_156
   248        9.3tb     9.3tb      1.5tb     10.9tb           85 172.29.4.178 172.29.4.178 es_node_178

假设我们希望下掉es_node_158_2这个节点, 则下面3条命令任选其一

curl -XPUT 127.0.0.1:9200/_cluster/settings -H 'Content-Type: application/json' -d '{
  "transient" :{
    "cluster.routing.allocation.exclude._ip": "<node_ip_address>"
  }
}'


curl -XPUT 127.0.0.1:9200/_cluster/settings -H 'Content-Type: application/json' -d '{
  "transient" :{
    "cluster.routing.allocation.exclude._name": "es_node_158_2"
  }
}'


curl -XPUT 127.0.0.1:9200/_cluster/settings -H 'Content-Type: application/json' -d '{
  "transient" :{
    "cluster.routing.allocation.exclude._id": "<node_id>"
  }
}'

确认上面的命令执行成功

curl -XGET "127.0.0.1:9200/_cluster/settings?pretty=true"
{
  "persistent" : {
    "cluster" : {
      "max_shards_per_node" : "30000"
    },
    "indices" : {
      "breaker" : {
        "fielddata" : {
          "limit" : "20%"
        }
      }
    },
    "search" : {
      "max_buckets" : "87000"
    },
    "xpack" : {
      "monitoring" : {
        "collection" : {
          "enabled" : "true"
        }
      }
    }
  },
  "transient" : {
    "cluster" : {
      "routing" : {
        "allocation" : {
          "enable" : "all",
          "exclude" : {
            "_name" : "es_node_158_2"
          }
        }
      }
    }
  }
}

然后Elasticsearch会将es_node_158_2节点上的shards分配给其余节点. 再次查看shards allocation情况会发现es_node_158_2上面的shards数量在明显减少.

$ curl -XGET "127.0.0.1:9200/_cat/allocation?v"
shards disk.indices disk.used disk.avail disk.total disk.percent host         ip           node
   248        9.3tb     9.3tb      1.5tb     10.9tb           85 172.29.4.178 172.29.4.178 es_node_178
   438          1tb       1tb      9.9tb     10.9tb            9 172.29.4.177 172.29.4.177 es_node_177
   417      559.9gb   561.1gb     16.9tb     17.4tb            3 172.29.4.157 172.29.4.157 es_node_157
   441      963.1gb     1.8tb     15.6tb     17.4tb           10 172.29.4.156 172.29.4.156 es_node_156_2
   443      842.5gb     1.8tb     15.6tb     17.4tb           10 172.29.4.156 172.29.4.156 es_node_156
   443      747.1gb     1.5tb     15.9tb     17.4tb            8 172.29.4.158 172.29.4.158 es_node_158
   285      472.7gb     1.5tb     15.9tb     17.4tb            8 172.29.4.158 172.29.4.158 es_node_158_2  # shards开始减少

2, stop node and afterwork

等es_node_158_2上面的shards数量变为0的时候, 就可以登陆es_node_158_2并shutdown elasticsearch service了.

在es_node_158_2上面执行

$ systemctl stop elasticsearch
$ systemctl disable elasticsearch

在其它node上面执行

$ curl -XPUT 127.0.0.1:9200/_cluster/settings -H 'Content-Type: application/json' -d '{
  "transient" :{
    "cluster.routing.allocation.exclude._name": null
  }
}'

参考文档: https://www.elastic.co/guide/en/elasticsearch/reference/current/modules-cluster.html#cluster-shard-allocation-filtering

Leave a Comment

使用python判断IP段可用IP及数量

使用python判断IP段可用IP及数量, 很简单.几个命令就可以(本文基于python3).

>>> import ipaddress
>>> bool(ipaddress.ip_address('172.21.97.12') in ipaddress.ip_network('172.16.0.0/12'))
True
>>>
>>> for ip in ipaddress.ip_network('192.168.0.0/28'):
...     print(ip)
...
192.168.0.0
192.168.0.1
192.168.0.2
192.168.0.3
192.168.0.4
192.168.0.5
192.168.0.6
192.168.0.7
192.168.0.8
192.168.0.9
192.168.0.10
192.168.0.11
192.168.0.12
192.168.0.13
192.168.0.14
192.168.0.15
>>>
>>> ipaddress.ip_network('192.168.0.0/28').num_addresses
16

批量计算

$ cat 2
172.16.128.0/18
172.16.32.0/20
172.16.64.0/19
172.19.192.0/19
172.16.240.0/21
172.16.48.0/20
172.16.192.0/19
172.19.160.0/19
172.19.64.0/18
172.16.24.0/21
172.16.96.0/19
172.19.128.0/19


$ python3
>>> import ipaddress
>>> with open("./2", "r") as f:
...     for i in f.readlines():
...         print(ipaddress.ip_network(i.rstrip()).num_addresses)
...
16384
4096
8192
8192
2048
4096
8192
8192
16384
2048
8192
8192


3 Comments

ElasticSearch DSL聚合查询语句

本来像聚合(aggregation)这种东西, 在Grafana中可以轻易的实现, 但是偶尔会有需求, 需要自己写DSL脚本实现一些功能, 于是, 只好自己动手了.

例子1

查询serverName=”dns-server-1″结果里, 按hostip的数量进行排序, 取前5

GET /my-service-2020.07.22/_search
{
  "query": {
    "term": { "serverName.keyword": "dns-server-1" }
  },
  "size" : 0,
  "aggs": {
    "top-10-hostip": {
      "terms": {
      	"field": "hostip.keyword",
        "size": 5
      }
    }
  }
}

结果

Leave a Comment

python字符串对齐

对于基本的字符串对齐操作,可以使用字符串的 ljust() , rjust() 和 center() 方法。比如:

>>> text = 'Hello World'
>>> text.ljust(20)
'Hello World         '
>>> text.rjust(20)
'         Hello World'
>>> text.center(20)
'    Hello World     '

所有这些方法都能接受一个可选的填充字符。比如:

>>> text.rjust(20,'=')
'=========Hello World'
>>> text.center(20,'*')
'****Hello World*****'
>>>

如果你想指定一个非空格的填充字符,将它写到对齐字符的前面即可:

>>> format(text, '=>20s')
'=========Hello World'
>>> format(text, '*^20s')
'****Hello World*****'

当格式化多个值的时候,这些格式代码也可以被用在 format() 方法中。比如:

>>> '{:>10s} {:>10s}'.format('Hello', 'World')
'     Hello      World'

下面是一个例子

>>> top_5_domain = [{'key': 'www.hizy.net', 'doc_count': 32109556}, {'key': 'www.xpdo.net', 'doc_count': 12070}, {'key': 'www.zhukun.net', 'doc_count': 1156}, {'key': 'image.baidu.com', 'doc_count': 114}, {'key': 'cloudrea.ksidc.com', 'doc_count': 11}]
>>>
>>> format_temp = "\t {:<20} \t\t {:>12}"
>>> for d in top_5_domain:
...     print(format_temp.format(d["key"],str(d["doc_count"])))
...
     www.hizy.net         		     32109556
     www.xpdo.net         		        12070
     www.zhukun.net       		         1156
     image.baidu.com      		          114
     cloudrea.ksidc.com   		           11


Leave a Comment